在 uni-app 中使用vuex
由于 uni-app 已经内置了 vuex,所以只要正确引入即可。
1、在项目的根目录下,创建一个名为 store 的文件夹然后在该文件夹下创建一个 index.js 的 js 文件
2、在该 js 文件下定义公共的数据以及方法函数,并且把它导出。
1 | import Vue from 'vue' |
3、在入口文件即:main.js 挂载 vuex
1 | import Vue from 'vue' |
4、在单页面里使用 vuex
1 | export default { |
由于 uni-app 已经内置了 vuex,所以只要正确引入即可。
1、在项目的根目录下,创建一个名为 store 的文件夹然后在该文件夹下创建一个 index.js 的 js 文件
2、在该 js 文件下定义公共的数据以及方法函数,并且把它导出。
1 | import Vue from 'vue' |
3、在入口文件即:main.js 挂载 vuex
1 | import Vue from 'vue' |
4、在单页面里使用 vuex
1 | export default { |
接口类型是对其它类型行为的概括与抽象。通过使用接口,我们可以写出更加灵活和通用的函数,这些函数不用绑定在一个特定的类型实现上。
很多面向对象的语言都有接口这个概念,Go 语言的接口的独特之处在于它是隐式实现。换句话说,对于一个具体的类型,无须声明它实现了哪些接口,只要 提供接口所需的方法即可。这种设计让你无须改变已有类型的实现,就可以为这些类型创建新的接口,对于那些不能修改包的类型,这一点特别有用。
具体类型,如 int、float32 等,指定了它们所含数据的精确布局,还暴露了基于这个精确布局的内部操作。比如对于数值类型有算术操作,对于 slice 类型我们有索引、append、range 操作等。具体类型还会通过其方法来提供额外的能力。总之,如果你知道了一个具体类型的数据,那么你就 精确地知道了它是什么以及它能干什么。
Go 语言中还有另外一种类型成为称为 接口类型。接口是一种抽象类型,它并没有暴露所含数据的布局或者内部结构,当然也没有那些数据的基本操作, 它所提供的仅仅是一些方法而已。如果你拿到一个接口类型的值,你无从知道它是什么,你能知道的仅仅是它能做什么, 或者更精确地讲,仅仅是它提供了哪些方法。
一个接口类型定义了一套方法,如果一个具体类型要实现该接口,那么必须实现接口类型定义中的所有方法。
io.Writer
是一个广泛使用的接口,它负责所有可以写入字节类型的抽象,包括文件、内存缓冲区、网络链接、HTTP
客户端等。 io 包还定义了很多有用的接口。Reader
就抽象了所有可以读取字节的类型,Closer
抽象了所有可以关闭的类型,比如文件或者网络连接。
1 | package go |
另外,我们还可以发现通过组合已有接口得到新的接口,如:
1 | type ReaderWriter interface { |
如上语法称为嵌入式接口,与嵌入式结构类似,让我们可以直接使用一个接口,而不用逐一写出这个接口所包含的方法。
如下所示,尽管不够简洁,但是可以不用嵌入式来声明
io.ReadWriter:
1 | type ReadWriter interface { |
三种声明的效果都是一样的。方法定义的顺序也是无意义的,真正有意义的只有接口的方法集合。
如果一个类型实现了一个接口要求的所有方法,那么这个类型实现了这个接口。比如
*os.File 类型实现了
io.Reader、io.Writer、Closer 和
ReaderWriter 接口。 *bytes.Buffer 实现了
Reader、Writer 和
ReaderWriter,但是没有实现 Closer,因为它没有
Close 方法。 为了简化表述,Go 程序员通常说一个具体类型
"是一个"(is-a)特定的接口类型,这其实代表着该具体类型实现了该接口。
比如,*bytes.Buffer 是一个
io.Writer;*os.File 是一个
io.ReaderWriter。
接口的赋值很简单,仅当一个表达式实现了一个接口时,这个表达式才可以赋给该接口。所以:
1 | var w io.Writer |
当右侧表达式也是一个接口时,该规则也有效:
1 | w = rwc // OK: io.ReadWriteCloser 有 Write 方法 |
因为 ReadWriter 和 ReadWriterCloser
接口包含了 Writer 的所有方法,所以任何实现了
ReadWriter 或 ReadWriterCloser 类型
的方法都必然实现了 Writer。
在进一步讨论之前,我们先解释一下一个类型有某一个方法的具体含义。对每一个具体类型 T,部分方法的接收者就是 T,而其它方法的接收者则是 T 指针。 同时我们对类型 T 的变量直接调用 T 的方法也可以是合法的,只要改变量是可变的,编译器隐式地帮你完成了取地址的操作。但这仅仅是一个语法糖, 类型 T 的方法没有对应的指针 *T 多,所以实现的接口也可能比对应的指针少。
比如,下面的 IntSet 类型的 String 方法,需要一个指针接收者,所以我们无法从一个无地址的 IntSet 值上调用该方法:
1 | type IntSet struct {} |
但可以从一个 IntSet 变量上调用该方法:
1 | var s IntSet |
因为只有 *IntSet 有 String 方法,所以也只有实现了 fmt.Stringer 接口:
1 | var _ fmt.Stringer = &s // OK |
正如信封封装了信件,接口也封装了所对应的类型和数据,只有通过接口暴露的方法才可以调用,类型的其它方法则无法通过接口来调用:
1 | os.Stdout.Write([]byte("hello")) // OK: *os.File 有 Write 方法 |
一个拥有更多方法的接口,比如 io.ReadWriter,与
io.Reader
相比,给了我们它所指向数据的更多信息,当然也给实现这个接口提出更高的门槛。
那么对于接口类型
interface{},它完全不包含任何方法,通过这个接口能得到对应具体类型的什么信息呢?
确实什么信息也得不到。看起来这个接口没有任何用途,但实际上称为空接口类型的
interface{} 是不可缺少的。正因为空接口类型没有对其实现类型
有任何要求,所以我们可以把任何值赋给空接口类型。
1 | var any interface{} |
当然,即使我们创建了一个指向布尔值、浮点数、字符串或者其它类型的
interface{}
接口,也无法直接使用其中的值,毕竟这个接口不包含任何方法。
我们需要一个方法从空接口中还原出实际值,如类型断言。
判断是否实现接口只需要比较具体类型和接口类型的方法,所以没有必要在具体类型的定义中声明这种关系。也就是说,偶尔在注释中标注也不坏,但对于程序来讲,
这种关系声明不是必需的。如下声明在编译器就断言了
*bytes.Buffer 类型的一个值必然实现了
io.Writer:
1 | // *bytes.Buffer 必须实现 io.Writer |
我们甚至不需要创建一个新的变量,因为 *bytes.Buffer
的任意值都实现了这个接口,甚至 nil,在我们用
*bytes.Buffer(nil) 来强制类型转换后,
也实现了这个接口。当然,既然我们不想引用
w,那么我们可以把它替换为空白标识符。
1 | // *bytes.Buffer 必须实现 io.Writer |
非空的接口类型(比如 io.Writer)通常由一个指针类型来实现,特别是当接口类型的一个或多个方法暗示会修改接收者的情形(比如 Write 方法)。 一个指向结构的指针才是最常见的方法接收者。
指针类型肯定不是实现接口的唯一类型,即使是那些包含了会改变接收者方法的接口类型,也可以由 Go 的其它引用类型来实现。
一个具体类型可以实现很多不相关的接口。比如一个程序管理或者销售数字文化商品,比如音乐、电影和图书。那么它可能定义了如下具体类型:
1 | Album |
我们可以把感兴趣的每一种抽象都用一种接口类型来表示。一些属性是所有商品都具备的,比如标题、创建日期以及创建者列表(作者或者艺术家)。
1 | type Artifact interface { |
其它属性则局限于特定类型的商品。比如字数这个属性只与书和杂志相关,而屏幕分辨率则只与电影和电视剧相关。
1 | type Text interface { |
这些接口只是一种把具体类型分组并暴露它们共性的方式,未来我们也可以发现其它的分组方式。比如,如果我们要把 Audio 和 Video 按照同样的方式来处理, 就可以定义一个 Streamer 接口来呈现它们的共性,而不用修改现有的类型定义。
1 | type Streamer interface { |
从具体类型出发、提取其共性而得出的每一种分组方式都可以表示为一种接口类型。 与基于类的语言(它们显式地声明了一个类型实现所有的接口)不同的是,在 Go 语言里我们可以在需要时才定义新的抽象和分组,并且不用修改原有类型的定义。 当需要使用另一个作者写的包里的具体类型时,这一点特别有用。当然,还需要这些具体类型在底层是真正有共性的。
在本节中,我们将看到如何使用另外一个标准接口 flag.Value
来帮助我们定义命令行标志。考虑如下一个程序,它实现了睡眠指定时间的功能。
1 | var period = flag.Duration("period", 1 * time.Second, "sleep period") |
在程序进入睡眠前输出了睡眠时长。fmt 包调用了
time.Duration 的 String
方法,可以按照一个用户友好的方式来输出,
而不是输出一个以纳秒为单位的数字。
默认的睡眠时间是 1s,但是可以用 -period
命令行标志来控制。flag.Duration 函数创建了一个
time.Duration 类型的标志变量,
并且允许用户用一种友好的方式来指定时长,比如可以用 String
方法对应的记录方法。这种对称的设计提供了一个良好的用户接口。
1 | $ ./sleep -period 50ms |
因为时间长度类的命令行标志广泛应用,所以这个功能内置到了 flag 包。支持自定义类型其实也不难,只须定义一个满足 flag.Value 接口的类型,其定义如下所示:
1 | package flag |
String 方法用于格式化标志对应的值,可用于输出命令行帮助消息。由于有了该方法,因此每个 flag.Value 其实也是 fmt.Stringer。 Set 方法解析了传入的字符串参数并更新标志值。可以认为 Set 方法是 String 方法的逆操作,两个方法使用同样的记法规格是一个很好的实践。
从概念上来讲,一个接口类型的值(简称接口值)其实有两个部分:一个具体类型和该类型的一个值。二者称为接口的动态类型和动态值。
对于像 Go 这样的静态类型语言,类型仅仅是一个编译时的概念,所以类型不是一个值。在我们的概念模型中,用类型描述符来提供每个类型的具体信息, 比如它的名字和方法。对于一个接口值,类型部分就用对应的类型描述符来表述。
如下四个语句中,变量 w 有三个不同的值(最初和最后是同一个值):
1 | var w io.Writer |
接下来我们详细地查看一下在每个语句之后 w 的值和相关的动态行为。第一个语句声明 w:
1 | var w io.Writer |
在 Go 语言中,变量总是初始化为一个特定的值,接口也不例外。接口的零值就是把它的动态类型和值都设置为 nil。
一个接口值是否是 nil 取决于它的动态类型,所以现在这是一个 nil 接口值。可以用 w == nil 或者 w != nil 来检测一个接口值是否是 nil。
调用一个 nil 接口的任何方法都会导致崩溃:
1 | w.Write([]byte("hello")) // 崩溃:对空指针取引用值 |
第二个语句把一个 *os.File 类型的值赋给了 w:
1 | w = os.Stdout |
这次赋值把一个具体类型隐式转换为一个接口类型,它与对应的显式转换
io.Writer(os.Stdout)
等价。不管这种类型的转换是隐式的还是显式的,
它都可以转换操作数的类型和值。接口值的动态类型会设置为指针类型 *os.File
的类型描述符,它的动态值会设置为 os.Stdout 的副本,即一个
指向代表进程的标准输出的 os.File 类型的指针。

调用该接口值的 Write 方法,会实际调用 (*os.File).Write 方法,即输出 "hello"
1 | w.Write([]byte("hello")) // "hello" |
一般来讲,在编译时我们无法知道一个接口值的动态类型会是什么,所以通过接口来做调用必然需要使用动态分发。编译器必须生成一段代码来从类型描述符
拿到名为 Writer
的方法地址,再间接调用该方法地址。调用的接收者就是接口值的动态值,即
os.Stdout,所以实际效果与直接调用等价:
1 | os.Stdout.Writer([]byte("hello")) // "hello" |
第三个语句把一个 *bytes.Buffer 类型的值赋给了接口值:
1 | w = new(bytes.Buffer0 |
动态类型现在是
*bytes.Buffer,动态值现在则是一个指向新分配缓冲区的指针:
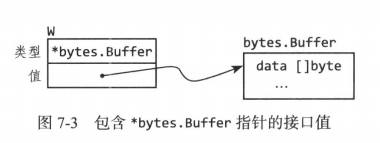
调用 Write 方法的机制也跟第二个语句一致:
1 | w.Write([]byte("hello")) // 把 "hello" 写入 bytes.Buffer |
这次,类型描述符是 bytes.Buffer,所以调用的是 (bytes.Buffer).Write 方法,方法的接收者是缓冲区的地址。调用该方法会追加 "hello" 到缓冲区。
最后,第四个语句把 nil 赋给了接口值:
1 | w = nil |
这个语句把动态类型和动态值都设置为 nil,把 w 恢复到了它刚声明时的状态。
一个接口值可以指向多个任意大的动态值。比如,time.Time
类型可以表明一个时刻,它是一个包含几个非导出字段的结构。如果从它创建一个接口值:
1 | var x interface{} = time.Now() |
结果是,x 的类型值是一个 time.Time 结构的值。
接口值可以用 == 和 != 操作符来做比较。如果两个接口值都是 nil 或者二者的动态类型完全一致且二者动态值相等(使用动态类型的 == 操作符来做比较), 那么两个接口值相等。因为接口值是可以比较的,所以它们可以作为 map 的键,也可以作为 switch 语句的操作数。
需要注意的是,在比较两个接口值的时,如果两个接口值的动态类型一致,但对应的动态值是不可比较的(比如 slice), 那么这个比较会以崩溃的方式失败:
1 | var x interface{} = []int{1, 2, 3} |
其它类型要么是可以安全比较的(比如基础类型和指针),要么是完全不可比较的,但当比较接口值或者其中包含接口值的聚合类型时, 我们必须消息崩溃的可能性。当把接口作为 map 的键或者 switch 语句的操作数时,也存在类似的风险。 仅在能确认接口值包含的动态值可以比较时,才比较接口值。
当处理错误或者调试时,能拿到接口值的动态类型是很有帮助的。可以使用 fmt 包的 %T 来实现这个需求。
1 | var w io.Writer |
在内部实现中,fmt 用反射来拿到接口动态类型的名字。
空的接口值(其中不包含任何信息)与仅仅动态值为 nil 的接口值是不一样的。
考虑如下程序,当 debug 设置为 true 时,主函数收集函数 f 的输出到一个缓冲区中:
1 | const debug = true |
当设置 debug 为 false
时,我们会觉得仅仅是不再收集输出,但实际上会导致程序在调用
out.Write 时崩溃:
1 | if out != nil { |
当 main 函数调用 f 时,它把一个类型为 *bytes.Buffer 的空指针赋给了 out 参数,所以 out 是一个包含空指针的非空接口, 所以防御性检查 out != nil 仍然是 true。
如前所述,动态分发机制决定了我们肯定会调用 (bytes.Buffer).Write,只不过这次接收者值为空。 对于某些类型,比如 os.File,空接收值是合法的,但对于 *bytes.Buffer 则不行。方法尽管被调用了,但在尝试访问缓冲区时崩溃了。
问题在于,尽管一个空的 *bytes.Buffer
指针拥有的方法满足了该接口,但它并不满足该接口所需的一些行为。
特别是,这个调用违背了 (*bytes.Buffer).Write
的一个隐式的前置条件,即接收者不能为空,所以把空指针赋给这个接口就是一个错误。
解决方案是把 main 函数中的 buf 类型修改为
io.Writer,从而避免在最开始就把一个功能不完整的值赋给一个接口。
1 | var buf io.Writer |
error 只是一个接口类型,包含一个返回错误消息的方法:
1 | type error interface { |
构造 error 最简单的方法是调用
errors.New,它会返回一个包含特定的错误消息的新 error
实例。完整的 error 包只有如下 4 行代码:
1 | package errors |
底层的 errorString 类型是一个结构,而没有直接用字符串,主要是为了避免将来无意间的布局变更。满足 error 接口的是 *errorString 指针, 而不是原始的 errorString,主要是为了让每次 New 分配的 error 实例都互不相等。我们不希望出现像 io.EOF 这样重要的错误,与仅仅 包含同样错误消息的一个错误相等。
1 | fmt.Println(errors.New("EOF") == errors.New("EOF")) // false |
直接调用 errors.New 比较罕见,因为有一个更易用的封装函数
fmt.Errorf,它还额外提供了字符串格式化功能。
1 | package fmt |
尽管 *errorString 可能是最简单的 error
类型,但这样简单的 error 类型远不止一个。
类型断言是一个作用在接口值上的操作,写出来类似于
x.(T),其中 x 是一个接口类型的表达式,而 T
是一个类型(称为断言类型)。
类型断言会检查作为操作数的动态类型是否满足指定的断言类型。
这儿有两个可能。首先,如果断言类型 T 是一个具体类型,那么类型断言会检查 x 的动态类型是否就是 T。如果检查成功,类型断言的结果就是 x 的动态值, 类型当然是 T。换句话说,类型断言就是用来从它的操作数中把具体类型的值提取出来的操作。如果检查失败,那么操作崩溃。比如:
1 | var w io.Writer |
其次,如果断言类型 T 是一个接口类型,那么类型断言检查 x 的动态类型是否满足 T。如果检查成功,动态值并没有提取出来,结果仍然是一个接口值, 接口值的类型和值部分也没有变更,只是结果的类型为接口类型 T。换句话说,类型断言是一个接口值表达式,从一个接口类型变为拥有另外一套方法的接口类型 (通常方法数量是增多),但保留了接口值中的动态类型和动态值部分。
如下类型断言代码中,w 和 rw 都持有
os.Stdout,于是所有对应的动态类型都是 *os.File,但 w 作为
io.Writer 仅暴露了文件的 Write 方法, 而 rw 还暴露了它的
Read 方法。
1 | var w io.Writer |
无论哪种类型作为断言类型,如果操作数是一个空接口值,类型断言都失败。很少需要从一个接口类型向一个要求更宽松的类型做类型断言, 该宽松类型的接口方法比原类型的少,而且是子集。因为除了在操作 nil 之外的情况下,在其它情况下这种操作与赋值一致。
1 | w = rw // io.ReadWriter 可以赋给 io.Writer |
我们经常无法确定一个接口值的动态类型,这时就需要检测它是否是某一个特定类型。如果类型断言出现在需要两个结果的赋值表达式中, 那么断言不会在失败时崩溃,而是会多返回一个布尔型的返回值来指示断言是否成功。
1 | var w io.Writer = os.Stdout |
按照惯例,一般把第二个返回值赋给一个名为 ok 的变量。如果操作失败,ok 为 false,而第一个返回值为断言类型的零值, 在这个例子中就是 *bytes.Buffer 的空指针。
ok 返回值通常马上就用来决定下一步做什么。下面 if 表达式的扩展形式就可以让我们写出相当紧凑的代码:
1 | if f, ok := w.(*os.File); ok { |
考虑一下 os 包中的文件操作返回的错误集合,I/O 会因为很多原因失败,但有三类原因通常必须单独处理: 文件已存储(创建操作),文件没找到(读取操作)以及权限不足。os 包提供了三个帮助函数来对错误进行分类:
1 | package os |
一个幼稚的实现会通过检查错误消息是否包含特定的字符串来做判断:
1 | func IsNotExist(err error) bool { |
但由于处理 I/O 错误的逻辑会随着平台的变化而变化,因此这种方法很不健壮,同样的错误可能会用完全不同的错误消息来报告。 检查错误消息是否包含特定的字符串,这种方法在单元测试中还算够用,但对于生产级的代码则远远不够。
一个更可靠的方法是用专门的类型来代表结构化的错误值。os 包定义了一个 PathError 类型来表示在与一个路径相关的操作上发生错误 (比如 Open 或者 Delete),一个类似的 LinkError 用来表述在与两个文件路径相关的操作上发生错误(比如 Symlink 和 Rename)。 下面是 os.PathError 的定义:
1 | package os |
很多客户端忽略了 PathError,该用一种统一的方法来处理所有的错误,即调用 Error 方法。 PathError 的 Error 方法只是拼接了所有的字段,而 PathError 的结构则保留了错误所有的底层信息。 对于那些需要区分错误的客户端,可以使用类型断言来检查错误的特定类型,这些类型包含的细节远远多于一个简单的字符串。
1 | _, err = os.Open("/no/such/file") |
这也是之前三个帮助函数的工作方式。比如,如下所示的 IsNotExist
判断错误是否等于 syscall.ENOENT,或者 等于另一个错误
os.ErrNotExist,或者是一个
*PathError,并且底层的错误是上面二者之一。
1 | import ( |
实际使用情况如下:
1 | _, err := os.Open("/no/such/file") |
当然,如果错误消息已被 fmt.Println
这类的方法合并到一个大字符串中,那么 PathError
的结构信息就丢失了。错误识别通常必须在失败操作发生时马上处理,而不是等到错误消息返回给调用者之后。
2023-01-31 更新:使用 goproxy 即可。
前提,有 ss,打开 git bash,运行:
1 | export http_proxy=http://127.0.0.1:1080;export https_proxy=http://127.0.0.1:1080; |
当然这里端口可能不一样,需要根据实际端口修改。
然后,再运行 go get xxx (在同一个终端)
如果想打开 git bash 的时候默认使用 http
代理,可以在用户主目录添加一个 .bashrc 文件,里面就写:
export http_proxy=http://127.0.0.1:1080;export https_proxy=http://127.0.0.1:1080;
格式:x.(T)
含义:断言 x 不是 nil 并且存储的是
T 类型的值
用途:
检查 x 是否为 nil
检查 x 能否转换为类型 T
转换 x 为类型 T
返回值:
t := x.(T),返回一个类型为 T 的值,如果
x 为 nil,产生 panic
t, ok := x.(T) ,如果 x 为 nil
或者不是 T 类型,ok 的值为
false,否则 ok 的值为 true 并且
t 是一个类型为 T 的值。
使用方式:
1 | v, ok = x.(T) |
判断 interface{} 的类型
转换 interface{} 为具体的类型
1 | package main |
输出
1 | golang |
本文中,我们将学习几种删除数据的方法:
删除单个文档或者一组文档。这样做的时候,Elasticsearch 只是将它们标记为删除,所以它们不会再出现于搜索结果中, 稍后 Elasticsearch 通过异步的方式将它们彻底地从索引中移出。
删除整个索引。这是删除多组文档的特例。但是不同点在于这样做的性能更好。 主要的工作就是移除和那个索引相关的所有文件,几乎是瞬间就能完成。
关闭索引。尽管这和删除无关,还是值得一提。关闭的索引不允许读取或者写入操作,数据也不会加载到内存。 这和删除 Elasticsearch 数据类似,但是索引还是保留在磁盘上。它也很容易恢复,只要再次打开关闭的索引。
有几种方式移除单个文档,这里讨论主要的几个。
通过 ID 删除单个文档。如果只有一篇文档要删除,而且你知道它的 ID,这样做非常不错。
在单个请求中删除多篇文档。如果有多篇文档需要删除,可以在一个批量请求中一次性删除它们,这样比每次只删除一篇文档更快。
删除映射类型,包括其中的文档。这样的操作会高效地搜索并删除该类型中所索引的全部文档,也包括映射本身。
删除匹配某个查询的所有文档。这和删除映射类型相似,内部运行一个查询,并识别需要删除的文档。只有在这里可以指定任何想要的查询,然后删除匹配的文档。
为了删除单一的文档,需要向其 URL 发送 HTTP DELETE 请求。例如:
1 | curl -XDELETE 'localhost:9200/online-shop/shirts/1' |
也可以使用版本来管理删除操作的并发,就像索引和更新的并发控制一样。举个例子,假设某款衬衫销售一空,你想移除这篇文档,这样它就不会 出现在搜索结果中。但是当时你可能并不知道,新的采购到货了,而且库存数据也被更新了。为了避免这种情况,可以在 DELETE 请求中 加入版本 version 参数,就像索引和更新的操作那样。
尽管如此,删除的版本控制还是有个特殊情况。一旦删除了文档,它就不复存在了,于是一个更新操作很容易重新创建该文档,尽管这是不应该 发生的(因为更新的版本要比删除的版本更低)。由于外部版本可以用于不存在的文档上,使用外部版本时这个问题尤为突出。
为了防止这样的问题发生,Elasticsearch 将在一段时间内保留这篇文档的版本,如此它就能拒绝版本比删除操作更低的更新操作了。 默认情况下,这个时间是 60 秒,对于多数情况而应该足够了,但是你可以通过设置 elasticsearch.yml 文件中或者是每个索引配置中的 index.gc_deletes 来修改它。
你也可以删除整个映射类型,包括映射本身和其中索引的全部文档。要如此操作,需要向 DELETE 请求提供类型的 URL:
1 | curl -XDELETE 'localhost:9200/online-shop/shirts' |
删除类型时需要注意的是,类型名称只是文档中的另一个字段。索引中的所有文档,无论它们属于哪个类映射类型,都存放在同一个分片中。 当发送前面的命令时,Elasticsearch 只能查询属于哪个类型的文档,然后删除它们。当针对删除类型和删除完整索引两者的性能进行比较时, 这是很重要的细节。因为删除类型通常要耗费更长的时间和更多的资源。
以同样的方式,可以查询某个类型中所有的文档并删除它们,Elasticsearch 允许通过称为查询删除(delete by query)的 API 来指定自己的 查询,查找想要删除的文档。使用这个 API 和运行查询类似,除了 HTTP 请求变为 DELETE,而且 _search 的端点变为了 _query。
例如,为了从聚会索引 get-together 中移除所有匹配 "Elasticsearch" 的文档,可以运行这个命令:
1 | curl -XDELETE 'localhost:9200/get-together/_query?q=elasticsearch' |
和那些查询类似,可以通过查询特定的类型、多个类型、索引中的任何地方、多个索引甚至是整个索引,来运行一个删除操作。 在全部索引中查询时,通过查询的删除要特别小心。
正如你所想,为了删除一个索引,需要发送一个 DELETE 请求到该索引的 URL:
1 | curl -XDELETE 'localhost:9200/get-together' |
通过提供以逗号分隔的列表,还可以删除多个索引。如果将索引名称改为 _all,甚至可以删除全部的索引/
提示:使用 curl -DELETE localhost:9200/_all 会删除所有的文档,听上去是不是很危险?可以设置 elasticsearch.yml 中的 action.destructive_requires_name: true 来预防这种情况的发生。这会使得 Elasticsearch 在删除的时候拒绝 _all 参数,以及索引名称中的通配符。
删除索引是很快的,因为它基本上就是移除了索引分片相关的文件。和删除单独的文档相比,删除文件系统中的文件会更快。这样操作的时候,文件只是被标记为已删除。在分段进行合并时,它们才会被移除。这里的合并是指将多个 Lucene 小分段组合为一个更大分段的过程。
一个分段是建立索引的时候所创建的一块 Lucene 索引(按照 Elasticsearch 的术语,也称作分片)。当你索引新的文档时,其内容不会添加到分段的尾部,而只会创建新的分段。由于删除操作只是将文档标记为待删除,所以分段中的数据也从来不会被移除。最终,更新文档意味着重新索引,数据就永远不会被修改。
当 Elasticsearch 在分片上进行查询的时候,Lucene 需要查询它的所有分段,合并结果,然后将其返回 -- 就像查询同一个索引中多个分片的过程。就像分片那样,分段越多,搜索请求越慢。
你可能已经想到,日常的索引操作会产生很多这样的小分段。为了避免一个索引中存在过多的分段,Lucene 定期将分段进行合并。
合并文档意味着读取它们的内容(除了被删除的文档),然后利用组合的内容创建新的、更大的分段。这个过程需要资源,尤其是 CPU 和磁盘的 I/O。幸运的是,合并操作是异步运行的,Elasticsearch 也允许配置相关的若干选项。
除了删除索引,还可以选择关闭它们。如果关闭一个索引,就无法通过 Elasticsearch 来读取和写入其中的数据,直到再次打开它。当使用应用日志这样的流式数据时,此操作非常有用。你会在后面了解到,将流式数据以基于时间的索引方式来存储是非常棒的注意。例如,每天创建一个索引。
在现实世界中,最好永远地保存应用日志,以防要查看很久之前的信息。另一方面,在 Elasticsearch 中存放大量数据需要增加资源。对于这种使用案例,关闭旧的索引非常有意义。你可能并不需要那些数据,但是也不想删除它们。
为了关闭在线商店的索引,发送 HTTP POST 请求到该索引 URL 的 _close 端点:
1 | curl -XPOST 'localhost:9200/online-shop/_close' |
为了再次打开,要运行类似的命令,只是将端点换为 _open:
1 | curl -XPOST 'localhost:9200/online-shop/_open' |
一旦索引被关闭,它在 Elasticsearch 内存中唯一的痕迹是其元数据,如名字以及分片的位置。如果有足够的磁盘空间,而且也不确定是否需要在那个数据中再次搜索,关闭索引要比删除索引更好。关闭它们会让你非常安心,永远可以重新打开被关闭的索引,然后在其中再次搜索。
映射定义了文档中的字段,以及这些字段是如何被索引的。我们说 Elasticsearch 是无须模式(scheme)的,因为映射是自动扩展的,不过在实际生产中,需要经常控制哪些被索引,哪些被存储,以及如何存储。
文档中的多数字段是核心类型,如字符串和数值。这些字段的索引方式对于 Elasticsearch 的表现以及搜索结果的相关性有着很大的影响。
单一字段也可以包含多个字段或取值。我们了解了数组和多字段,它们让你在单一字段中拥有同一核型类型的多个实例。
除了用于文档的字段,Elasticsearch 还提供了预定义的字段,如 _source 和 _all。配置这些字段将修改某些你并没有显式提供给文档的数据,但是对于性能和功能都有很大影响。例如,可以决定哪些字段需要在 _all 里索引。
由于 Elasticsearch 在 Lucene 分段里存储数据,而分段一旦创建就不会修改,因此更新文档意味着检索现存的文档,将修改放入即将索引的新文档中,然后删除旧的索引。
当 Lucene 分段异步合并时,就会移除待删除的文档。这也是为什么删除整个索引要比删除单个或多个文档要快 - 索引删除只是意味着移除磁盘上的文件,而且无须合并。
在索引、更新和删除过程中,可以使用文档版本来管理并发问题。对于更新而言,如果因为并发问题而导致更新失败了,可以告诉 Elasticsearch 自动重试。