0%

context 的作用

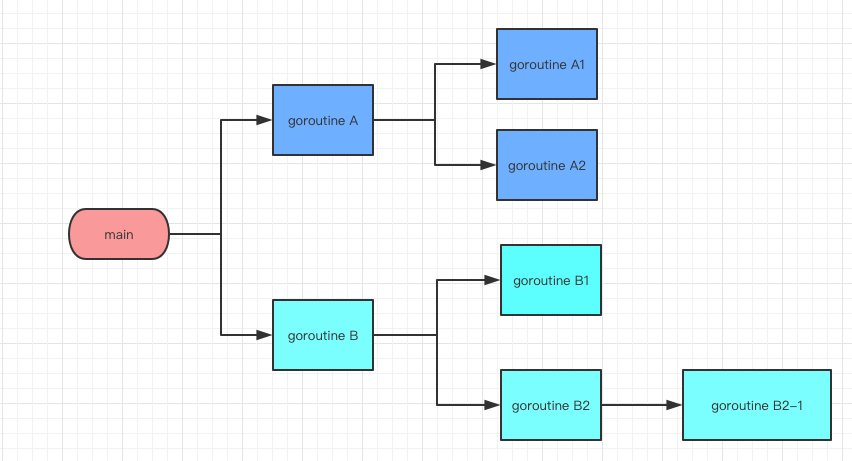
go 的编程中,常常会在一个 goroutine 中启动多个 goroutine,然后有可能在这些 goroutine 中又启动多个 goroutine。
goroutine-0

如上图,在 main 函数中,启动了一个 goroutine A 和 goroutine B,然后 goroutine A 中又启动了 goroutine A1 和 goroutine A2,goroutine B 中也是。

有时候,我们可能想要取消当前的处理,这个时候自然而然的也要取消子协程的执行进程。这个时候就需要一种机制来做这件事。context 就是设计来做这件事的。

比如在 web 应用中,当子协程的某些处理时间过长的时候,我们可能想要终止下游的处理,防止协程长期占用资源。保证其他客户端的请求正常处理。

context 的不同类型

context.Background

往往用做父 context,比如在 main 中定义的 context,然后在 main 中将这个 context 传递给子协程。

context.TODO

不需要使用什么类型的 context 的时候,使用这个 context.TODO

context.WithTimeout

我们需要对子 goroutine 做一些超时控制的时候,使用这个 context,比如超过多少秒就不再做处理。

context.WithDeadline

和 context.WithTimeout 类似,只不过参数是一个 time.Time,而不是 time.Duration

context.WithCancel

如果在父 goroutine 里面需要在某些情况下取消执行的时候,可以使用这种 context。

实例

context.Background

1
2
3
4
5
6
7
8
9
10
11
12
13
14
15
16
17
18
19
20
21
22
23
package main

import (
"context"
"fmt"
"time"
)

func main() {
ctx := context.Background()

go func(ctx2 context.Context) {
fmt.Println("ctx2")

ctx3, cancel := context.WithCancel(ctx2)
go func(ctx4 context.Context) {
fmt.Println("ctx4")
}(ctx3)
cancel()
}(ctx)

time.Sleep(time.Millisecond * 5)
}

在 main 入口里顶层的 context 使用 context.Background,子 goroutine 里面可以针对实际情况基于父 context 派生新的 context,比如,加入如果需要对子 goroutine 做一些条件性的取消操作,就可以像上面那样使用 ctx3, cancel := context.WithCancel(ctx2) 来基于父 context 创建一个新的 context,然后我们可以通过 cancel 来给子 goroutine 发送取消信号

注意这里的用语,这里说发送取消信号,因为事实上是否取消后续操作的控制权还是在子 goroutine 里面。但是子 goroutine 有义务停止当前 goroutine 的操作。

个人觉得一个原因是,可能子 goroutine 里面有一些清理操作需要进行,比如写个 Log 说当前操作被取消了,这种情况下直接强行取消并不是很好的选择,所以把控制权交给子 goroutine。

这一点可能在大多数文章里面可能没有提到,但是笔者觉得如果明白了这一点的话,对于理解 context 的工作机制很有帮助。

这种机制的感觉有点像是,虽然你有权力不停止当前操作,但是你有义务去停止当前的处理,给你这种权力只是为了让你有点反应时间。

context.TODO

这个就跳过吧,好像没什么好说的

context.WithTimeout

1
2
3
4
5
6
7
8
9
10
11
12
13
14
15
16
17
18
19
20
21
22
23
24
25
func ExampleContextWithTimeout() {
// 10 毫秒超时时间
// context.WithTimeout 也返回了一个 cancel 函数,但是我们这里不需要,所以忽略了。
ctx, _ := context.WithTimeout(context.Background(), time.Millisecond * 10)
var wg sync.WaitGroup
wg.Add(1)
go func(ctx context.Context) {
defer wg.Done()
// sleep 20 毫秒模拟耗时任务
time.Sleep(time.Millisecond * 20)
select {
case <-ctx.Done():
// 因为已经超时了,所以 ctx.Done() 返回的 channel 直接返回了,因为已经关闭了
// 我们可以使用 ctx.Err() 来查看具体的原因,这里是 "context deadline exceeded"
fmt.Println(ctx.Err())
return
default:
fmt.Println("in goroutine")
}
}(ctx)
wg.Wait()

// Output:
// context deadline exceeded
}

context.WithDeadline

1
2
3
4
5
6
7
8
9
10
11
12
13
14
15
16
17
18
19
20
21
22
23
24
25
func ExampleContextWithDeadline() {
// 10 毫秒超时时间
// context.WithDeadline 也返回了一个 cancel 函数,但是我们这里不需要,所以忽略了。
ctx, _ := context.WithDeadline(context.Background(), time.Now().Add(time.Millisecond * 10))
var wg sync.WaitGroup
wg.Add(1)
go func(ctx context.Context) {
defer wg.Done()
// sleep 20 毫秒模拟耗时任务
time.Sleep(time.Millisecond * 20)
select {
case <-ctx.Done():
// 因为已经到达了 deadline,所以 ctx.Done() 返回的 channel 直接返回了,因为这个 channel 已经关闭了
// ctx.Err() 同 context.WithTimeout,也是 "context deadline exceeded"
fmt.Println(ctx.Err())
return
default:
fmt.Println("in goroutine")
}
}(ctx)
wg.Wait()

// Output:
// context deadline exceeded
}

context.WithCancel

1
2
3
4
5
6
7
8
9
10
11
12
13
14
15
16
17
18
19
20
21
22
23
func ExampleContextWithCancel() {
// context.WithCancel 返回的第二个值是一个可以调用的函数,调用的时候子协程里面的 context 可以通过 ctx.Done() 获取到取消的信号
ctx, cancel := context.WithCancel(context.Background())
var wg sync.WaitGroup
wg.Add(1)
go func(ctx context.Context) {
defer wg.Done()
for {
select {
case <-ctx.Done():
fmt.Println(ctx.Err())
return
default:
fmt.Println("ExampleContextWithCancel default")
}
}
}(ctx)
cancel()
wg.Wait()

// Output:
// context canceled
}

其实我们可以发现,context.WithTimeout 和 context.WithDeadline 也返回了一个 cancelFunc,context.WithCancel 返回的 cancelFunc 和这个的效果一样。

只不过 context.WithTimeout 和 context.WithDeadline 多提供了一个时间上的控制。

总结

  1. golang 中的 context 提供了一种父子 goroutine 之间沟通的机制

  2. context.WithTimeout、context.WithDeadline、context.WithCancel 都返回一个新的 context 和一个 cancelFunc,cancelFunc 可以用来取消子 goroutine

  3. goroutine 最终是否停止取决于子 goroutine 本身,但是我们有必要去监听 ctx.Done() 来根据父 goroutine 传递的信号来决定是否继续执行还是直接返回。

  1. 参数化是什么?
  2. pytest 参数化的几种写法
  3. 装饰测试类
  4. 装饰测试函数
  5. ids

参数化是什么?

在单元测试中,我们有时候可能需要使用多组测试数据来测试同一个功能,在 pytest 中可以使用 @pytest.mark.parametrize 装饰器来装饰一个类或者方法来传递多组测试数据来测试同一个功能。

pytest 参数化的几种写法

  1. 使用多个形参接收参数化数据

test_1.py

1
2
3
4
5
6
7
8
9
10
11
12
13
14
15
16
17
import pytest

data = [
(1, 2, 3),
(4, 5, 9),
]


def add(a, b):
return a + b


@pytest.mark.parametrize('a, b, expect', data)
def test_parametrize_1(a, b, expect):
print("\n参数: a={}, b={}\n".format(a, b))
assert add(a, b) == expect

运行代码:

1
pytest -sv test_1.py

输出:

1
2
3
4
5
6
7
8
tests/aa/test_aa.py::test_parametrize_1[1-2-3] 
参数: a=1, b=2

PASSED
tests/aa/test_aa.py::test_parametrize_1[4-5-9]
参数: a=4, b=5

PASSED

在这个例子中,我们定义了一个数组,里面保存了两个元组,同时在测试函数上面使用了 @pytest.mark.parametrize('a, b, expect', data) 来装饰。 这个情况下,pytest 会循环 data 数据,把里面的每一项的数据拿出来,传递给 test_parametrize_1 运行。

实际效果可以看作如下伪代码:

1
2
3
for value in data:
for a, b, expect in value:
test_parametrize_1(a, b, expect)

如果只有一个参数,那就更简单了:

1
2
3
4
5
6
7
8
9
10
import pytest

data = [
1, 3
]


@pytest.mark.parametrize('a', data)
def test_parametrize_1(a):
print("\n参数: a={}\n".format(a))

输出:

1
2
3
4
5
6
7
8
tests/aa/test_aa.py::test_parametrize_1[1] 
参数: a=1

PASSED
tests/aa/test_aa.py::test_parametrize_1[3]
参数: a=3

PASSED
  1. 使用一个形参接收参数化数据
1
2
3
4
5
6
7
8
9
10
11
12
13
import pytest

data = [
[1, 2, 3],
[4, 5, 9],
]


@pytest.mark.parametrize('value', data)
def test_parametrize_1(value):
print("\n测试数据为\n{}".format(value))
actual = value[0] + value[1]
assert actual == value[2]

输出:

1
2
3
4
5
6
7
8
tests/aa/test_aa.py::test_parametrize_1[value0] 
测试数据为
(1, 2, 3)
PASSED
tests/aa/test_aa.py::test_parametrize_1[value1]
测试数据为
(4, 5, 9)
PASSED

这里的 value 参数直接接收了 data 里面的每一项。

和第一种 @pytest.mark.parametrize('a, b, expect', data) 的区别是,这里的 value 接收了 [a, b, expect] 这个数组作为值。

装饰测试类

@pytest.mark.parametrize 也可以用于装饰类,这样一来,该类中的测试方法就都有了这些参数,等同于给该类中的每一个测试方法加上 @pytest.mark.parametrize

例子

1
2
3
4
5
6
7
8
9
10
11
12
13
14
15
16
import pytest

data = [
[1, 2, 3],
[4, 5, 9],
]


@pytest.mark.parametrize('value', data)
class TestParametrize:
def test_parametrize_1(self, value):
print("\ntest_parametrize_1测试数据为\n{}".format(value))

def test_parametrize_2(self, value):
print("\ntest_parametrize_2 测试数据为\n{}".format(value))

输出

1
2
3
4
5
6
7
8
9
10
11
12
13
14
15
16
tests/aa/test_aa.py::TestParametrize::test_parametrize_1[value0] 
test_parametrize_1 测试数据为
[1, 2, 3]
PASSED
tests/aa/test_aa.py::TestParametrize::test_parametrize_1[value1]
test_parametrize_1 测试数据为
[4, 5, 9]
PASSED
tests/aa/test_aa.py::TestParametrize::test_parametrize_2[value0]
test_parametrize_2 测试数据为
[1, 2, 3]
PASSED
tests/aa/test_aa.py::TestParametrize::test_parametrize_2[value1]
test_parametrize_2 测试数据为
[4, 5, 9]
PASSED

装饰测试函数

这个在第一小节中已经提及

ids

我们在上面的测试中发现一些输出内容如下面的格式:

1
tests/aa/test_aa.py::TestParametrize::test_parametrize_1[value0]

后面有个方括号来表示当前测试的是第几组参数。这个我们可以自定义格式:

1
2
3
4
5
6
7
8
9
10
11
12
13
14
15
16
17
18
19
20
import pytest

data = [
[1, 2, 3],
[4, 5, 9],
]


# 这个格式会替代输出中方括号的内容
ids = ["a={}, b={}, expect={}".format(a, b, expect) for a, b, expect in data]


@pytest.mark.parametrize('value', data, ids=ids)
class TestParametrize:
def test_parametrize_1(self, value):
print("\ntest_parametrize_1 测试数据为\n{}".format(value))

def test_parametrize_2(self, value):
print("\ntest_parametrize_2 测试数据为\n{}".format(value))

输出

1
2
3
4
5
6
7
8
9
10
11
12
13
14
15
16
17
tests/aa/test_aa.py::TestParametrize::test_parametrize_1[a=1, b=2, expect=3] 
test_parametrize_1 测试数据为
[1, 2, 3]
PASSED
tests/aa/test_aa.py::TestParametrize::test_parametrize_1[a=4, b=5, expect=9]
test_parametrize_1 测试数据为
[4, 5, 9]
PASSED
tests/aa/test_aa.py::TestParametrize::test_parametrize_2[a=1, b=2, expect=3]
test_parametrize_2 测试数据为
[1, 2, 3]
PASSED
tests/aa/test_aa.py::TestParametrize::test_parametrize_2[a=4, b=5, expect=9]
test_parametrize_2 测试数据为
[4, 5, 9]
PASSED

这样一来我们的输出就更加的直观了。

输出的时候需要添加 -sv 参数,如 pytest -sv tests/aa/test_aa.py

1
2
$res = NULL;
$res->success = false; // Warning: Creating default object from empty value

产生原因是给一个值为 null 的变量设置属性。

先看看源码

1
2
3
4
5
6
7
8
9
10
11
12
13
14
15
16
17
18
19
20
21
22
23
24
25
26
// D is an ordered representation of a BSON document. This type should be used when the order of the elements matters,
// such as MongoDB command documents. If the order of the elements does not matter, an M should be used instead.
//
// Example usage:
//
// bson.D{{"foo", "bar"}, {"hello", "world"}, {"pi", 3.14159}}
type D = primitive.D

// E represents a BSON element for a D. It is usually used inside a D.
type E = primitive.E

// M is an unordered representation of a BSON document. This type should be used when the order of the elements does not
// matter. This type is handled as a regular map[string]interface{} when encoding and decoding. Elements will be
// serialized in an undefined, random order. If the order of the elements matters, a D should be used instead.
//
// Example usage:
//
// bson.M{"foo": "bar", "hello": "world", "pi": 3.14159}
type M = primitive.M

// An A is an ordered representation of a BSON array.
//
// Example usage:
//
// bson.A{"bar", "world", 3.14159, bson.D{{"qux", 12345}}}
type A = primitive.A

在 Go MongoDB Driver 中,我们调用 MongoDB Driver 提供的方法的时候,往往需要传入 bson.D, bson.A, bson.M, bson.A 这几种类型。

bson.D

用来表示一个有序的 BSON 文档,当我们需要传递一些有序的参数的时候可以使用,比如 MongoDB 中的聚合操作,聚合操作往往是一组操作的集合,比如先筛选、然后分组、然后求和,这个顺序是不能乱的。

bson.E

用来表示 bson.D 中的一个属性,类型定义如下:

1
2
3
4
5
// E represents a BSON element for a D. It is usually used inside a D.
type E struct {
Key string
Value interface{}
}

可以类比 json 对象里面的某一个属性以及其值。

为什么不是 bson.M 中的属性呢?

首先,bson.M 其实是一个 map,不接受这种类型,bson.D 实际上是 []bson.E 类型,是 bson.E 的切片。

其次,bson.M 里面是顺序无关的,普通的 map 就已经足够了,没必要再定义一个类型。

bson.M

用来表示无需的 BSON 文档,就是一个普通的 map 类型。在保存到 MongoDB 中的时候,字段顺序是不确定的,而 bson.D 的顺序是确定的。

顺序可能大部分情况都是不需要的。不过在匹配嵌套的 BSON 数组文档的时候,可能会有问题。但还是有其他的解决办法的。

可参考本站的: MongoDB $elemMatch 操作符

bson.A

用来表示 BSON 文档中的数组类型,是有序的。

$elemMatch 是 MongoDB 中用来查询内嵌文档的操作符。

创建一个简单文档

1
2
3
4
5
6
7
8
9
10
11
12
13
14
15
16
17
18
19
20
db.test.insert({
"id": 1,
"members": [
{
"name": "Jack",
"age": 27,
"gender": "M"
},
{
"name": "Tony",
"age": 23,
"gender": "F"
},
{
"name": "Lucy",
"age": 21,
"gender": "M"
}
]
})

使用多种方式尝试查询

  1. 使用 db.test.find({"members": {"name": "Jack"}}) 进行查询:
1
db.test.find({"members": {"name": "Jack"}})

查询的结果是空集。(因为 members 没有 name 字段)

  1. 只有完全匹配一个的时候才能获取到结果,因此:
1
db.test.find({"members": {"name": "Jack", "age": 27, "gender": "M"}})

可以得到结果

  1. 如果把键值进行颠倒,也得不到结果:
1
db.test.find({"members": {"name": "Jack", "gender": "M", "age": 27}})

得到的结果是空集。

  1. 我们这样查询:
1
db.test.find({"members.name": "Jack"})

是可以查询出结果的。

  1. 如果需要两个属性
1
db.test.find({"members.name": "Jack", "members.age": 27})

也可以查询结果。

  1. 我们再进行破坏性测试
1
db.test.find({"members.name": "Jack", "members.age": 23})

也可以查询出结果。

不过我们应该注意到:Jack 是数组中第一个元素的键值,而 23 是数组中第二个元素的键值,这样也可以查询出结果。

使用 $elemMatch 操作符查询

对于我们的一些应用来说,以上结果显然不是我们想要的结果。所以我们应该使用 $elemMatch 操作符:

  1. $elemMatch + 同一个元素中的键值组合
1
db.test.find({"members": {"$elemMatch": {"name": "Jack", "age": 27}}})

可以查询出结果。

  1. $elemMatch + 不同元素的键值组合
1
db.test.find({"members": {"$elemMatch": {"name": "Jack", "age": 23}}})

查询不出结果。

因此,a 展示的嵌套查询正是我们想要的查询方式。