有时候如果只是简单测试一些东西,不想配置跨域的话,可以尝试一下禁用 CORS。

Windows 10

1
"C:\Program Files (x86)\Google\Chrome\Application\chrome.exe" --disable-web-security --disable-gpu --user-data-dir=~/chromeTemp

OSX

1
open -n -a /Applications/Google\ Chrome.app/Contents/MacOS/Google\ Chrome --args --user-data-dir="/tmp/chrome_dev_test" --disable-web-security

Linux

1
google-chrome --disable-web-security

如果需要访问本地文件,加上 -–allow-file-access-from-files 标志。

goss: https://github.com/eleven26/goss

背景

一开始写这个东西只是为了写一个命令行工具,拿来将阿里云的 OSS 作为自己的一个临时的云盘,可以通过命令行上传下载一些文件。 当然可能有人会问那么多云盘为什么不用,简单来说就是觉得这些云盘用起来有点麻烦,你要打开网页或者打开客户端,我是大概是一个懒惰的人,只想省去这些繁琐的操作。 另外,这些云盘普遍有个特点就是上传下载速度往往比较慢,但用 OSS 来存储可以有一个较快的下载速度,只是会产生费用。

Goss 的优势

  • 支持常见的对象存储:阿里云 OSS、腾讯云 COS、七牛云 kodo、华为云 OBS。
  • 完善的测试:有完善的单元测试、集成测试。
  • 容易使用的接口:通过 storage.Put 等方式就可以上传下载文件,隐藏了繁琐的细节。
  • 易扩展:实现了 Storage 接口即可。

Goss 提供的接口

goss 目前提供了常用的一些接口:

这些接口覆盖了我的需要了,所以目前就只提供了这些接口;

Put

上传文件到云存储。第一个参数是 key,第二个参数是 io.Reader。

1
2
3
data := []byte("this is some data stored as a byte slice in Go Lang!")
r := bytes.NewReader(data)
err := storage.Put("test/test.txt", r)

PutFromFile

上传文件到云存储。第一个参数是 key,第二个参数是本地文件路径。

1
err := storage.PutFromFile("test/test.txt", "/path/to/test.txt")

Get

从云存储获取文件,返回字符串。参数是 key。返回值是 io.ReadCloser 和 error。

1
2
3
4
5
6
// rc 是 `io.ReadCloser`
rc, err := storage.Get("test/test.txt")
defer rc.Close()

bs, err := ioutil.ReadAll(rc)
fmt.Println(string(bs))

GetString

从云存储获取文件,返回字符串。参数是 key。返回值是 string 和 error

1
2
content, err := storage.GetString("test/test.txt")
fmt.Println(content)

GetBytes

从云存储获取文件,返回字符串。参数是 key。返回值是 []byte 和 error

1
2
bs, err := storage.Get("test/test.txt")
fmt.Println(string(bs))

GetToFile

下载云存储文件到本地。第一个参数是 key,第二个参数是本地路径。

1
2
// 第一个参数是云端路径,第二个参数是本地路径
err := storage.GetToFile("test/test.txt", "/path/to/local")

Delete

删除云存储文件。

1
err := storage.Delete("test/test.txt")

Exists

判断云存储文件是否存在。

1
exists, err := storage.Exists("test/test.txt")

Files

根据前缀获取文件列表。

1
exists, err := storage.Files("test/")

Size

获取云存储文件大小。

1
size, err := storage.Size("test/test.txt")

goss-cli

正如本文一开始说的,其实一开始是想做一个命令行工具的,最后写成了一个类库。

但是我的命令行工具也是存在的,从 goss 里面拆分出去了,成了 goss-cli

当然功能也是比较简单,但是也足够了,下面是一些示例:

help:

1
2
3
4
5
6
7
8
9
10
11
12
13
14
15
16
➜ goss -h
Usage:
[command]

Available Commands:
completion Generate the autocompletion script for the specified shell
debug 调试命令
get 获取指定文件
help Help about any command
list 列出指定目录下的文件
put 上传文件

Flags:
-h, --help help for this command

Use " [command] --help" for more information about a command.

list:

1
2
3
4
5
6
7
8
9
10
11
12
13
14
15
➜ goss list mac/
Size LastModified Key
0B 2018-06-18 00:13:24 mac/
452.2MB 2020-11-28 06:09:25 mac/Command_Line_Tools_for_Xcode_12.2.dmg
2.0MB 2018-06-18 01:04:39 mac/Go2Shell.dmg
135.3MB 2018-06-18 00:59:00 mac/Navicat Premium 12.0.23.dmg
155.0MB 2020-11-05 00:22:48 mac/Navicat Premium_15.0.20.dmg
1.2GB 2018-06-18 00:34:39 mac/Office 2016 for Mac 多国语言大客户版.dmg
31.0MB 2018-06-18 01:28:06 mac/Sketch49.dmg
16.0MB 2018-06-18 01:28:31 mac/Tunnelblick_3.7.6beta03_build_5031.dmg
69.5MB 2018-06-18 00:55:53 mac/googlechrome-67.0.3396.87.dmg
6.7MB 2018-06-18 01:04:45 mac/iTerm2-3_1_6.zip
13.0MB 2018-06-18 01:04:57 mac/mindnodexx.zip
43.5MB 2018-06-18 01:27:09 mac/privatetunnel-mac-2.8.dmg
459.2MB 2018-12-28 01:03:48 mac/vmware fushion.zip

get:

1
2
3
4
5
➜ goss get mac/Go2Shell.dmg
下载成功!保存路径:"Go2Shell.dmg"

➜ ls -lh Go2Shell.dmg
-rw-r--r-- 1 ruby staff 1.9M Aug 25 09:10 Go2Shell.dmg

注意:下面结果针对5.7版本,无论大表在前还是小表在前,in 的查询效率都要远远高于exists。但在8.0版本中,得益于版本的改善,in 的查询效率 与 exists 几乎没有明显差别。

MySQL 8 里面的优化可参考:Optimizing Subqueries with Materialization

MySQL 中的 in 语句是把外表和内表做 hash 连接,而 exists 语句是对外表做 loop 循环,每次 loop 循环再对内表进行查询。一直大家都认为 exists 比 in 语句的效率要高,这种说法其实是不准确的。需要分不同情况讨论。

exists 对外表用 loop 逐条查询,每次查询都会查看 exists 的条件语句,当 exists 里的条件语句能够返回记录行时(无论记录行有多少,只要能返回),条件就为真,返回当前 loop 到的这条记录,反之如果 exists 里的条件语句不能返回记录行,则当前 loop 到的这条记录被丢弃,exists 的条件就像一个 bool 条件,当能返回结果集则为 true,不能返回结果集则为 false。

实例一:exists 子句永远为 true

1
select * from user where exists (select 1);

对 user 表的记录逐条取出,由于子条件中的 select 1 永远能返回记录行,那么 user 表的所有记录都将被加入结果集,所以与 select * from user; 是一样的。

实例二:exists 子句永远为 false

这里假设 user 表的 userId 都是大于 0 的

1
select * from user where exists (select * from user where userId = 0);

可以知道对 user 表进行 loop 时,检查条件语句 select * from user where userId = 0,由于 userId 永远不为 0,所以条件语句永远返回空集,条件永远为 false,那么 user 表的所有记录都将被丢弃。

not exists 与 exists 相反,也就是当子查询有结果返回时,loop 到的记录将被丢弃,否则将 loop 到的记录加入结果集。

exists 的执行过程

总的来说,如果 A 表有 n 条记录,那么 exists 查询就是将这 n 条记录逐条取出,然后判断 n 遍 exists 条件。

in 的实际效果

in 查询相当于多个 or 条件的叠加,这个比较好理解,比如下面的查询:

1
select * from user where userId in (1, 2, 3);

等效于:

1
select * from user where userId = 1 or userId = 2 or userId = 3;

not in 与 in 相反,如下:

1
select * from user where userId not in (1, 2, 3);

等效于:

1
select * from user where userId != 1 and userId != 2 and userId != 3;

in 的执行过程

总的来说,in 查询就是先将子查询结果集拿出来,假设结果集为 B,共有 m 条记录,然后在将子查询条件的结果集分解成 m 个,再进行 m 次查询。

值得一提的是,in 查询的子条件返回结果必须只有一个字段,例如:

1
select * from user where userId in (select id from B);

而不能是:

1
select * from user where userId in (select id, age from B);

而 exists 就没有这个限制。

exists 和 in 的性能

考虑如下SQL语句

  1. select * from A where exists (select * from B where B.id = A.id);

  2. select * from A where A.id in (select id from B);

查询 1 可以转化为以下伪代码,便于理解:

1
2
3
4
5
6
7
8
9
10
$result = [];

for ($i = 0; $i < count(A); $i++) {
  $a = get_record(A, $i); // 从A表逐条获取记录

  if (B.id = $a[id]) // 如果子条件成立
    $result[] = $a;
}

return $result;

查询 1 主要是用到了 B 表的索引,A 表如何对查询的效率的影响应该不大。

假设B表的所有id为1,2,3,查询2可以转换为:

1
select * from A where A.id = 1 or A.id = 2 or A.id = 3;

这个就好理解了,这里主要是用到了 A 的索引,B 表如何对查询影响不大。

not exists 和 not in

  1. select * from A where not exists (select * from B where B.id = A.id);

  2. select * from A where A.id not in (select id from B);

查询 1 还是和上面一样,用了 B 的索引。

而对于查询 2,可以转化为如下语句:

1
select * from A where A.id != 1 and A.id != 2 and A.id != 3;

可以知道 not in 是个范围查询,这种 != 的范围查询无法使用任何索引,等于说 A 表的每条记录,都要在 B 表里遍历一次,查看 B 表里是否存在这条记录。

故 not exists 比 not in 效率高。

mysql 中的 in 语句是把外表和内表作 hash 连接,而 exists 语句是对外表作 loop 循环,每次 loop 循环再对内表进行查询。一直大家都认为 exists 比 in 语句的效率要高,这种说法其实是不准确的。这个是要区分环境的。

如果查询的两个表大小相当,那么用 in 和 exists 差别不大

如果两个表中一个较小,一个是大表,则子查询表大的用 exists,子查询表小的用 in:

例如,表 A(小表),表 B(大表)

  1. select * from A where cc in (select cc from B) 效率低,用到了 A 表上 cc 列的索引;

select * from A where exists(select cc from B where cc=A.cc) 效率高,用到了 B 表上 cc 列的索引。

相反的

  1. select * from B where cc in (select cc from A) 效率高,用到了 B 表上 cc 列的索引;

select * from B where exists(select cc from A where cc=B.cc) 效率低,用到了 A 表上 cc 列的索引。

not in 和 not exists 如果查询语句使用了 not in 那么内外表都进行全表扫描,没有用到索引;而 not exists 的子查询依然能用到表上的索引。

所以无论那个表大,用 not exists 都比 not in 要快。
copy

otiai10/copy 是一个可以让你递归地复制目录的库。

安装

1
go get github.com/otiai10/copy

示例

1
2
3
4
5
6
7
8
9
10
11
package main

import (
"fmt"
cp "github.com/otiai10/copy"
)

func main() {
err := cp.Copy("your/src", "your/dest")
fmt.Println(err) // nil
}

我们可以通过 kubernetes/dashboard 来对 k8s 进行一些可视化的管理。

参考文档:

creating-sample-user

web-ui-dashboard

创建服务账户

account.yml:

1
2
3
4
5
apiVersion: v1
kind: ServiceAccount
metadata:
name: admin-user # 账户名称,可以自定义
namespace: kubernetes-dashboard
1
kubectl apply -f account.yml

创建 ClusterRoleBinding

binding.yml:

1
2
3
4
5
6
7
8
9
10
11
12
apiVersion: rbac.authorization.k8s.io/v1
kind: ClusterRoleBinding
metadata:
name: admin-user
roleRef:
apiGroup: rbac.authorization.k8s.io
kind: ClusterRole
name: cluster-admin
subjects:
- kind: ServiceAccount
name: admin-user # 账户名称,可以自定义(跟上面的定义要一致)
namespace: kubernetes-dashboard
1
kubectl apply -f binding.yml

创建 token

dashboard 是通过 token 来登录的,所以这里需要生成 token。

1
kubectl -n kubernetes-dashboard create token admin-user

启动 proxy

1
kubectl proxy

然后打开 http://localhost:8001/api/v1/namespaces/kubernetes-dashboard/services/https:kubernetes-dashboard:/proxy/ 即可访问

打开这个链接后,输入上一步获取的 token 即可登录。

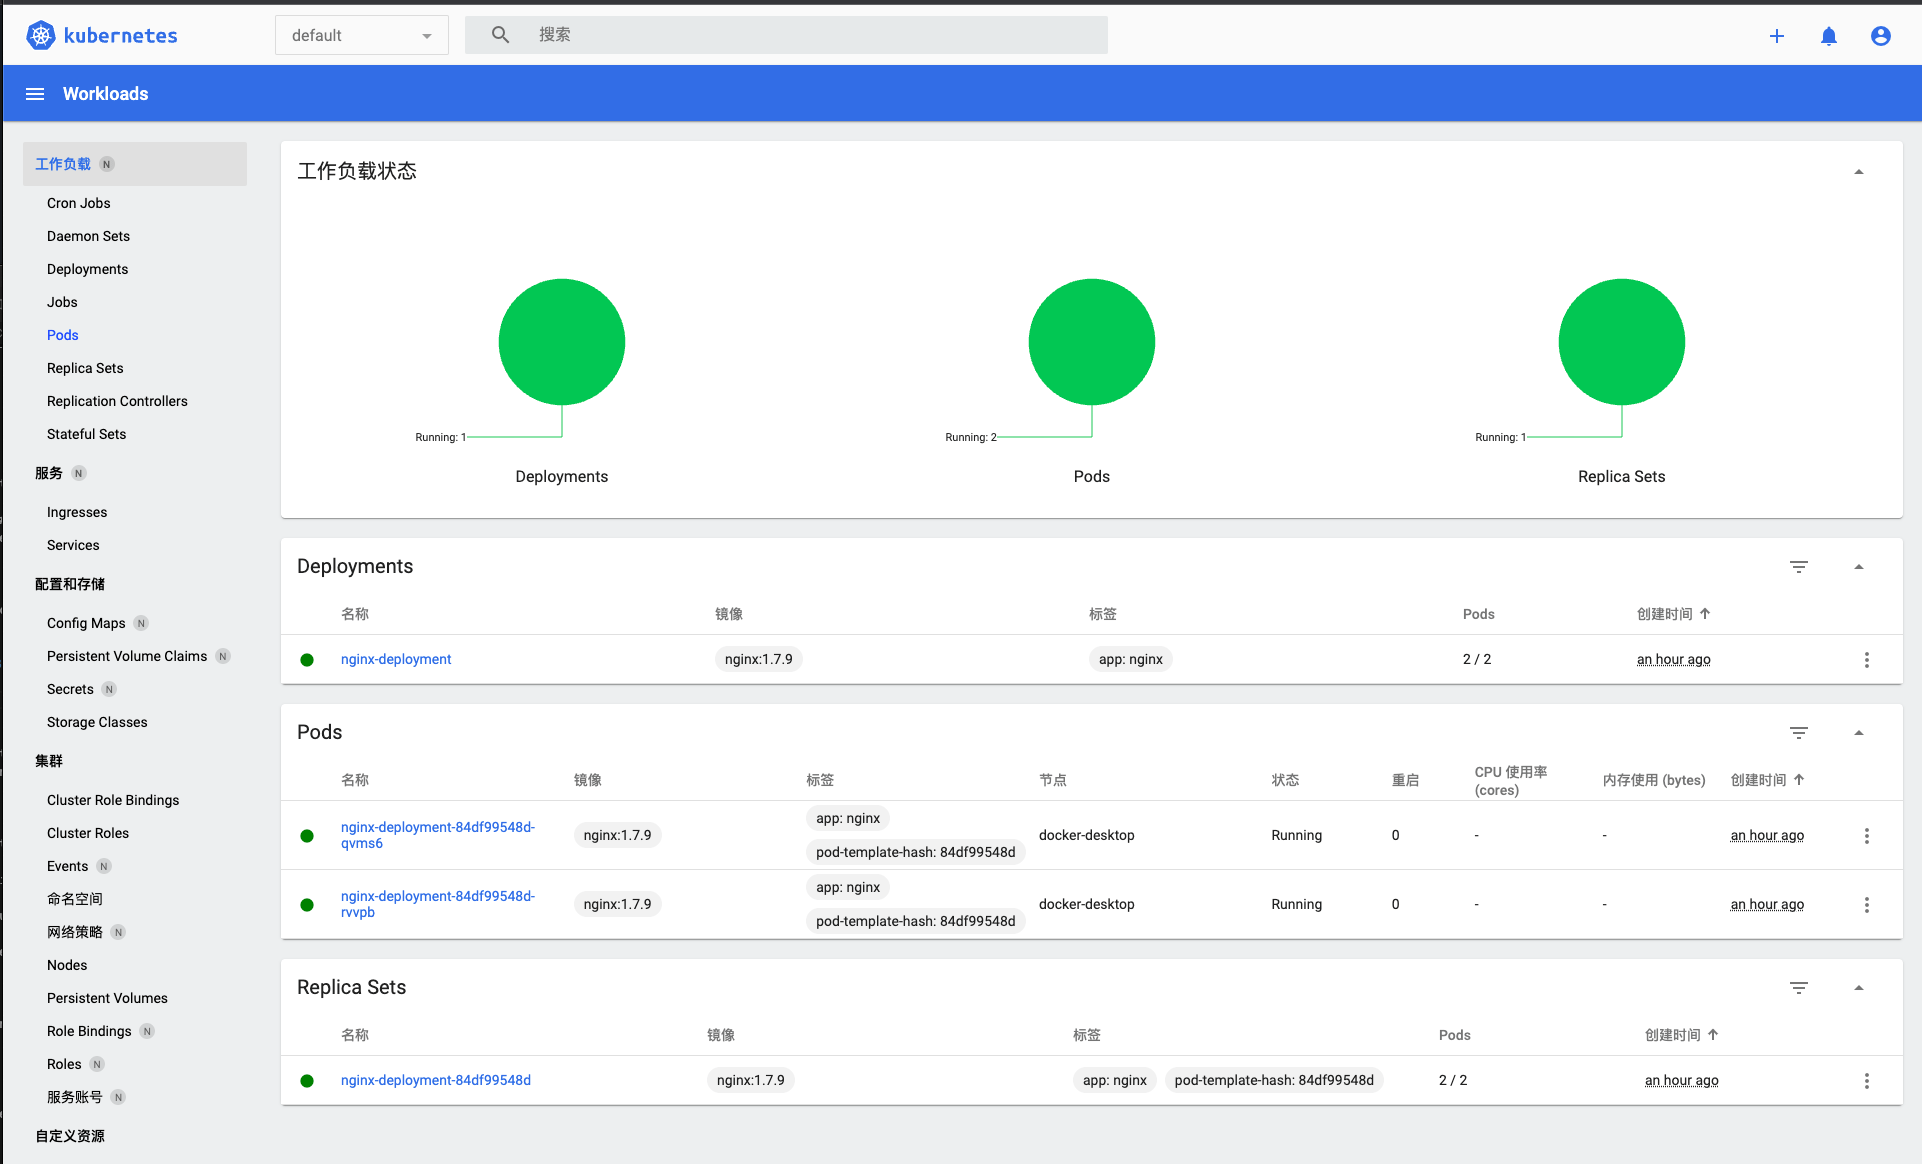
效果:

清理

如果我们不需要 dashboard 了,可以通过下面的命令来做一些清理工作:

1
2
kubectl -n kubernetes-dashboard delete serviceaccount admin-user
kubectl -n kubernetes-dashboard delete clusterrolebinding admin-user
0%