go Context 设计与实现
版本:go 1.19
在前一篇文章中我们讨论了 go Context
的一些常见使用方式,今天我们再来从源码的角度深入了解一下
Context 的设计与实现。 Context
的源码数量不多,去掉注释大概只有两三百行,但是包含的信息量巨大(所以本文也比较长),而且设计得非常巧妙,值得读一读。
然后,下面的 图解 propagateCancel 这一小节的几个图描述了
Context 的工作机制,如果不想看代码,可以直接拉到下面。
再了解一下 chan
在开始本文之前,先来了解一下 Context
实现的关键:chan,对于
chan(再准确一点,我们这里讨论的其实是只读
chan),我们需要清楚以下几点:
<-ch表示从 chan 中获取值。<-ch在通道(chan)尚未关闭的时候,会一直阻塞,直到通道接收到值。所以有时候通过select语句来监听chan,从而实现协程间的通信。<-ch在通道(chan)关闭了之后,会立即返回,但是返回的是chan关联类型的零值,如果我们还需要判断是否是因为关闭才返回的话,需要用两个值来接收<-ch的返回值,如v, ok := <-ch,ok表明了通道是否已经关闭,如果是关闭导致它返回,则返回的是false。
下面这个例子展示了 Context 实现的关键(通过
close(chan),所有 <-chan
会返回,本质上来说是一种 "广播机制"):
1 | package main |
在
Context中,context.Done()方法返回的chan,不会接收任何的值,但是在调用CancelFunc的时候,会关闭这个chan,因此 所有的<-context.Done()会返回一个零值,返回什么不重要,重要的是,它返回的时候就代表着被上游取消了(代表的是一个取消信号)。
Context 的 UML 图
先来看看它的 UML 图,在后面会陆续展开细说。
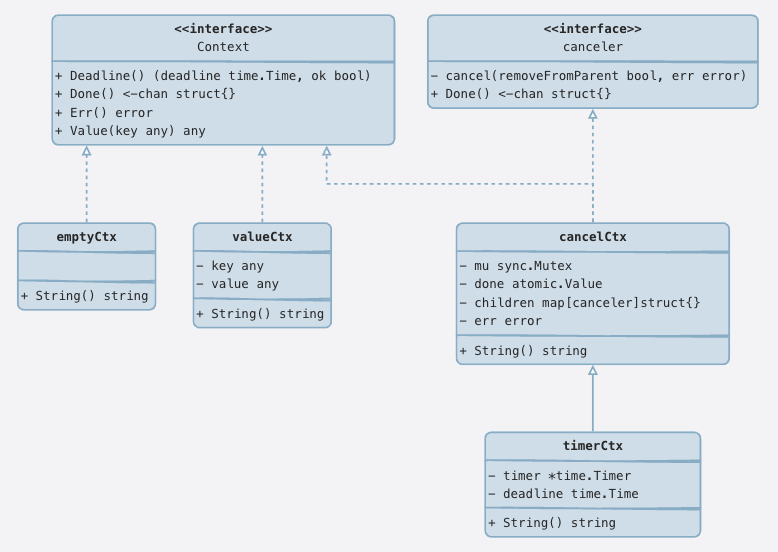
- 首先,有两个关键的接口,分别是
Context和canceler。Context里面的接口是我们实际开发的时候用的,而canceler是context包内部使用, 这个canceler接口定义了一个cancel方法,这个方法就是用来发送取消信号的。 emptyCtx代表一个空的Context,往往用作根Context,valueCtx在父Context的基础上加了一个键值对。cancelCtx同时实现了Context和canceler接口,表示一个可以取消的Context。timerCtx在cancelCtx的基础上加了一个定时器,表示可以在指定时间之后由定时器进行取消操作。又或者由开发者自行取消。
context 包的结构体、方法说明
Context接口:定义了Context接口的四个方法emptyCtx结构体:一个空ContextCancelFunc函数类型:Context的取消函数canceler接口:Context取消接口cancelCtx结构体:实现了取消接口的ContexttimerCtx结构体:超时会取消的ContextvalueCtx结构体:可以存储键值对的ContextBackground()函数:返回空Context,常作为根ContextTODO()函数:返回一个空Context,在需要Context的地方又没有合适的Context就用这个WithCancel()函数:基于父Context,创建一个可取消的ContextnewCancelCtx()函数:创建一个可取消的ContextpropagateCancel()函数:将节点挂载到上游第一个cancelCtx上,又或者启动协程监听Context取消事件parentCancelCtx()函数:返回上游的第一个cancelCtxremoveChild()函数:移除Context节点init()函数:包初始化函数,创建了一个关闭的chanWithDeadline()函数:创建一个有deadline的ContextWithTimeout()函数:创建一个有timeout的ContextWithValue()函数:创建一个存储键值对的Context
Context 接口
1 | type Context interface { |
Context 接口定义了 4
个方法,它们都是幂等的,也就是说连续多次调用同一个方法,得到的结果都是相同的。
Deadline() 示例:
1 | package main |
我们通过 Deadline() 方法可以知道当前拿到的
Context 参数是否设置了 deadline,以及 deadline 是什么时候,
从而决定接下来是否还需要做一些操作,如果时间太少的话,就可以考虑不做了,因为最终的结果还是超时。
canceler 接口
先看源码:
1 | type canceler interface { |
实现了 canceler 两个方法的
Context,就表明该 Context 是可取消的。
cancel 方法的第一个参数 removeFromParent
表示的是,是否从父 Context 移除自身,这是因为
Context 是一个树状结构。 在 Context
取消的时候,它会给所有派生的 Context
也发送取消信号,所以派生新的 Context 的时候会记录从当前
Context 派生出去的 Context。
但同样的,在 Context 被取消的时候,父
Context 也就再也不需要给这个 Context
发送取消信号啥的。
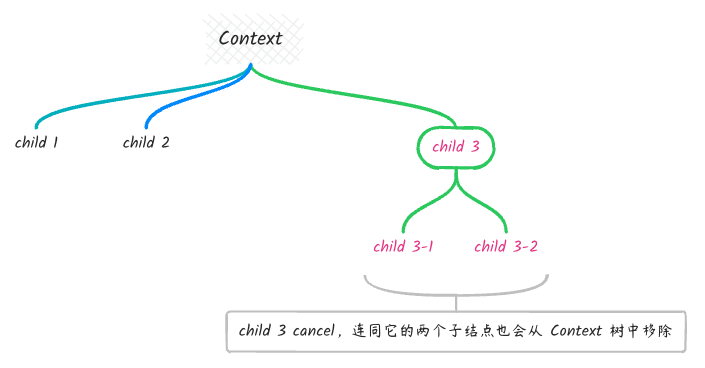
我们可以看这个图,Context 派生出了三个
Context,当 child 3 这个 Context
cancel 的时候,只会影响到 child 3-1 和
child 3-2 以及其自身, cancel 之后,根结点的
Context 再发送取消信号,child 3
就再也收不到了,因为它已经从这棵树中移除。
emptyCtx 结构体
emptyCtx 本身没有什么实际的作用,一般用作根
Context,比如在 main 函数里面创建的
Context。
1 | type emptyCtx int |
我们使用 context.Background() 或者
context.TODO() 的时候返回的就是一个
emptyCtx:
1 | var ( |
emptyCtx 永远不会被取消,也没有值和
deadline。TODO 用在需要 Context 但又没有合适的
Context 可以用的时候。
cancelCtx 结构体
cancel 的操作实际上只会做一次,后续调用
cancel 的时候会返回第一次 cancel
的结果,cancel 是一个幂等操作。
1 | // 可以被取消,取消的时候,所有实现了 canceler 接口的派生出来的 Context 也会被取消。 |
cancelCtx.done是一个支持原子操作的chan struct{}。
先来看看它的 Done() 方法实现:
1 | // 返回一个只读的 chan,但没有任何地方会往这个 chan 写入数据, |
再来看看 Err 方法:
1 | func (c *cancelCtx) Err() error { |
cancel 方法
然后再来看 cancel 方法的实现:
cancel 方法做了如下操作:
- 关闭
c.done - 取消
c的所有孩子Context - 如果
removeFromParent为true,会将c从其父Context的children属性中移除
1 | // 发送取消信号 |
WithCancel 方法
我们再来看看创建 cancelCtx 的方式:
1 | // 返回值里的 Context 的 Done 方法返回的 channel 关闭或者 parent 被 cancel 的时候, |
我们看到这里的 CancelFunc 的里面调用 cancel
的时候,第一个参数是 true,这表示在取消的时候,需要从
parent 中移除自身。
parentCancelCtx 方法
parentCancelCtx 方法用以从 parent
开始直到根节点的路径搜索第一个 cancelCtx,会跳过中间的
valueCtx。
1 | // 返回当前节点到根节点路径上的第一个 *cancelCtx。 |
propagateCancel 函数
这个函数会在两个地方调用,一个是 WithCancel,另一个是
WithDeadline,它的主要作用是,找到 parent
以及其父级 Context 路径上 第一个
cancelCtx,目的是,将 child 挂载到找到的这个
cancelCtx 的 children 属性上,从而在这个
cancelCtx 取消的时候, 可以通过遍历
cancelCtx.children 对 child 进行通知。
1 | // 由 parent 往根节点搜索第一个 cancelCtx,如果找到则将 child 写入到 cancelCtx.children 中。 |
图解 propagateCancel
propagateCancel
的实现可能只看代码不好理解,所以我画了几个图来帮助我们理解:
我们可以看到 propagateCancel 里面有一个
parentCancelCtx,对于
parentCancelCtx,下一小节有比较详细的说明。 这个图描述了
parentCancelCtx 的实际执行过程,在我们调用
propagateCancel 的时候,搜索 cancelCtx
的过程:
- 首先,我们知道,
Context是一个树状结构,每一个Context都可以派生出子Context。 - 图中
parentA是child到根节点emptyCtx路径上的第一个cancelCtx。 parentCancelCtx拿到的是parentA,然后将child写入到parentA的children属性中。- 从而在我们手动取消
parentA的时候,parentA可以通过遍历children的方式,告知child协程取消了。
注意:搜索的时候会跳过
valueCtx。
在 child 到 emptyCtx
路径上搜索第一个 cancelCtx 的过程:

我们取消的过程大概如下图:
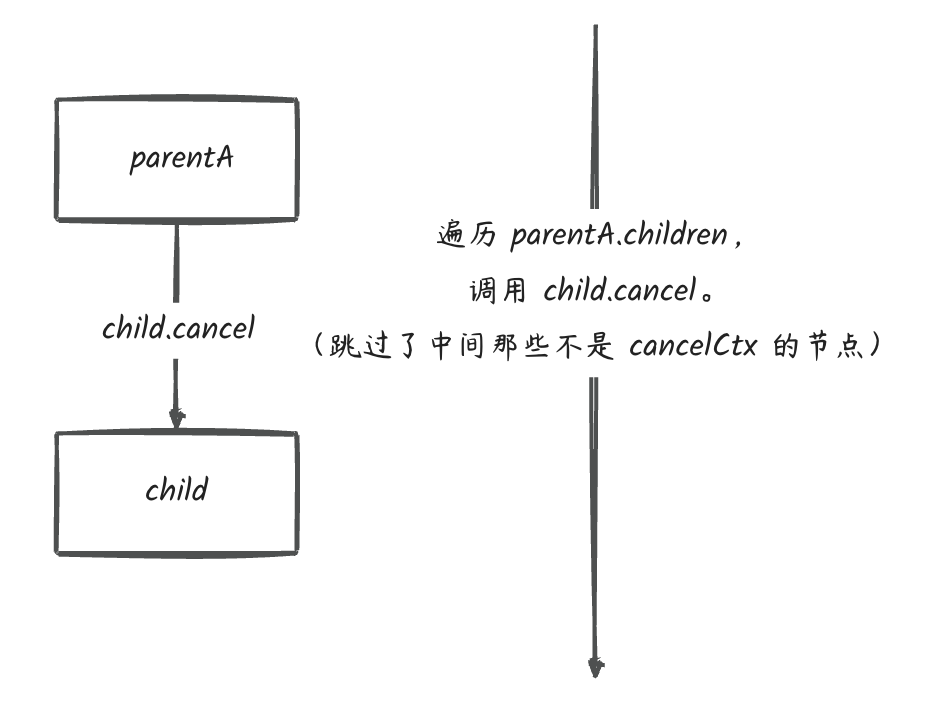
我们理解取消的过程的时候,可以忽略掉 Context 树中那些非
cancelCtx 节点,正如上图这样,实际上取消过程只涉及到
parentA 以及 child,
其他节点如何并不影响。
如果觉得这个图不太好懂,可以再看看这个图:

用户覆盖了 done 的特殊情况:

如果用户覆盖了 done 通道,这表明用户想自行控制什么时候
parentB 结束。(也就是说,parentB 脱离了路径上
cancelCtx 的控制, 也就是假设 parentA 还是
cancelCtx,在 parentA
取消的时候,parentB 是收不到信号的,parentB
收到信号是在其 Done() 返回的通道关闭的时候。)
这个时候因为我们从 parentB 派生出了一个新的
cancelCtx(child),所以 parentB
需要对 child 进行控制, 也就是说在 parentB
取消的时候,也取消 child。这种情况下,就是通过
propagateCancel 里面的协程里面实现的。
parentCancelCtx 函数
parentCancelCtx
的描述比较晦涩,如果没有实际的例子我们很难看得懂它的意思。里面有一个比较,
是针对 parent.Done() 和
p.done.Load().(chan struct{})
的,源码里面判断如果这两者不一样,则返回 nil 和
false。
注释里说,如果两者不一样,我们不应该绕过它(bypass it),但是这里的绕过是什么意思呢?我们来看一个例子:
1 | package c |
下面这个图描述了上面这个例子中的 Context 树结构:
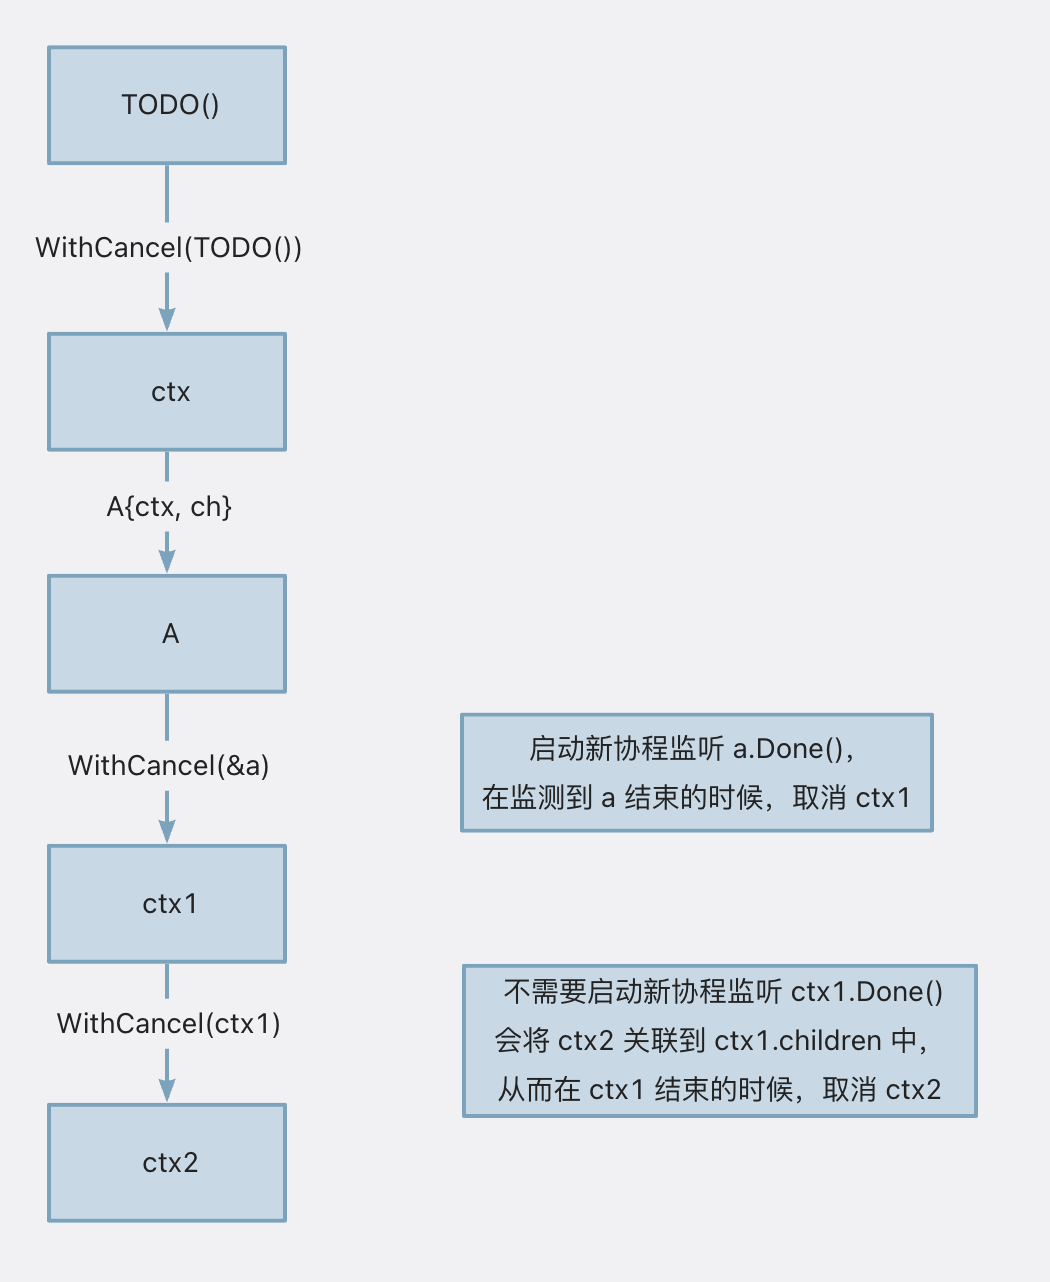
我们调用了三次 WithCancel,这三次的效果都不太一样:
- 第一次调用的时候,
parent.Done返回nil,这个时候,我们取消只有调用cancel0这一种途径,也就是手动取消。 - 第二次调用的时候,
parent.Done返回的不是nil,但是和 go 语言底层的那个done属性不一致(一个是A.Done(),另一个是cancelCtx.done)。这种情况下,go 底层就知道,开发者自己定义了一个done通道,这个时候,会需要另外启动一个协程来监听A.Done()返回的done,从而可以在A结束的时候,通知A的孩子ctx1。 - 第三次调用的时候,
parent.Done返回的不是nil,而且和cancelCtx.done相等,说明用户没有重写Done方法,这样就可以直接将ctx2挂载到ctx1的children属性上,而不用另外启动协程来监听ctx1的done。
具体怎么实现的可以看上面的 propagateCancel
这一小节。
之所以这样是为了给开发者一定的控制权,如果忽略了用户自定义的
Done方法,那么可能取消的操作用户就无法控制了。 但我们覆盖Done方法就是为了可以自主去控制取消的操作。
child 什么时候从父 Context 移除?
如果我们足够细心,就会发现我们在 cancel
的时候,有的地方需要将 child 从 Context
中移除,而有的地方不需要,那什么时候需要呢?
需要移除的情况:
WithCancel派生出新的Context的时候,假设叫root,这个时候派生的这个root也是可以继续派生出新的Context的,而这个root对于它的子孙Context它就是根节点,所以当root被取消的时候,它和它的子孙Context也要被取消了,所以以root为根节点的子树需要被移除。WithDeadline里面,当给定的d其实已经小于当前时间的时候(也就是父Context已经超时了),这个时候会将刚挂载到父节点的timerCtx移除,同时返回的CancelFunc中,cancel的第一个参数是false,因为它已经被移除了。
不需要移除的情况:
- 在
propagateCancel中监测到parent已经被取消的时候,因为这个时候child并没有关联上parent,所以自然也没有移除的这种操作。 - 就是上面提到的第二种情况中,
WithDeadline的时候就监测到deadline已经比当前时间小了(超时了)。 - 在
cancelCtx的cancel方法里面,遍历cancelCtx的孩子节点的时候,不需要做移除的操作,因为cancelCtx本身就需要被从Context树中移除。 timerCtx在没有挂载到parent上就已经过期了。
timerCtx 结构体
timerCtx 是一个带有定时器的
cancelCtx,我们既可以手动取消,也可以由底层定时器在到达
deadline 的时候进行取消。
1 | // timerCtx 嵌套了 cancelCtx,这表示我们可以手动取消。 |
我们有两种方法来创建 timerCtx,一个是
WithDeadline:
1 | // 基于 parent 创建一个 cancelCtx,内嵌到 timerCtx 中。 |
另外一个是 WithTimeout:
WithTimeout 本质上是对 WithDeadline
的调用而已,只不过描述到期时间的方式不一样而已。
WithDeadline
描述的是具体的到期时间,WithTimeout
描述的是多久以后的时间,两者其实都代表未来的某一个时间点。
1 | func WithTimeout(parent Context, timeout time.Duration) (Context, CancelFunc) { |
valueCtx
1 | // valueCtx 在父 Context 的基础上,带有一对键值对。 |
WithValue 方法
WithValue
方法一般用在请求范围内的数据共享,WithValue
方法很简单,就是在 parent 的基础上加上了一个
key 和 一个 value。
1 | // 返回的子 Context 里面有 key val 对 |
valueCtx
valueCtx 是从其他 Context
派生出来的,所以内嵌了 Context 接口,同时还有两个字段是
key 和 val,表示的是父 Context
传递的键值。
1 | type valueCtx struct { |
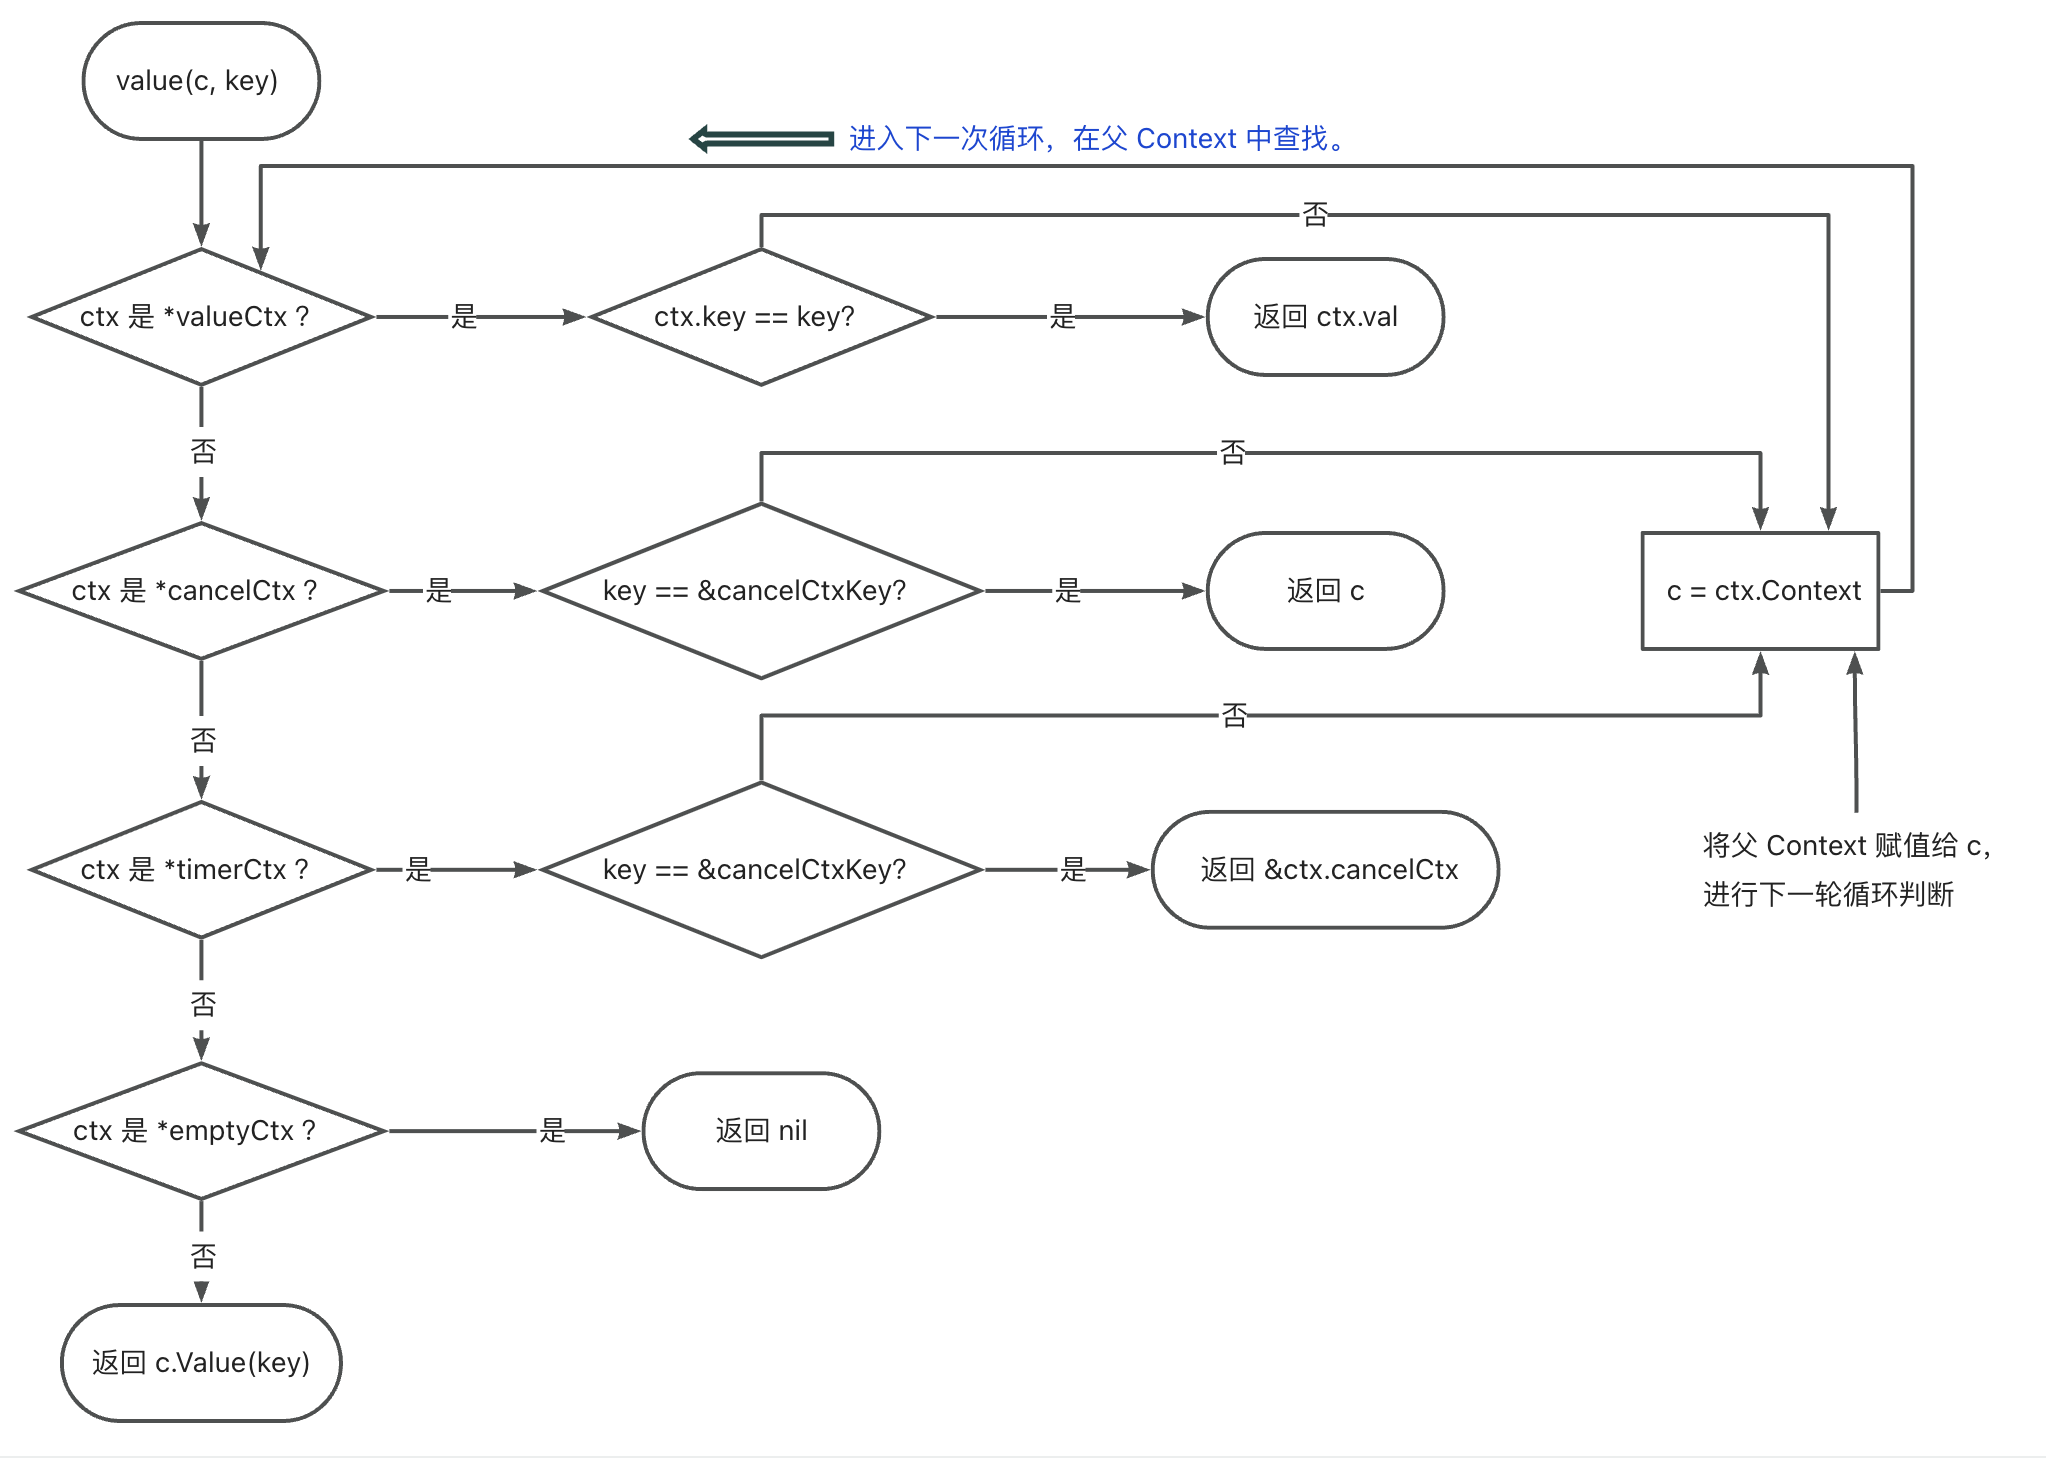
value 方法
value 方法用以从 Context
中获取对应的值,它会从 Context
树自底向上进行递归搜索,具体来说会有以下几种情况:
- 如果
ctx是*valueCtx,则会判断key是否等于ctx里面的key,如果相等,返回ctx.val。否则,再去搜索ctx的父Context。 - 如果
ctx是*cancelCtx,同时key是&cancelCtxKey,则会返回ctx。否则,会继续搜索ctx到根结点这个路径上的第一个cancelCtx。 - 如果
ctx是*timerCtx,同时key是&cancelCtxKey,则会返回ctx.cancelCtx。否则,会继续搜索ctx到根结点这个路径上的第一个cancelCtx。 - 如果
ctx是*emptyCtx,则会返回nil。(因为这时候是最顶层的Context了,也找不到对应的值)。 - 如果都不是以上的几种情况,则有可能是开发者自定义的
Context实现,则直接返回c.Value(key)。
它要解决的问题是:
- 获取父级
Context中WithValue共享的值。 - 获取父级
Context中最靠近当前节点的cancelCtx(非常重要:它的一个很重要的作用是,将当前节点设置为这个cancelCtx的children,从而可以实现在这个父级的cancelCtx取消的时候,当前的Context可以感知到)。 - 如果是开发者自己实现的
Context,则直接调用用户自定义的Value方法。
1 | // 根据 key 从 c 中获取对应的值,会从 Context 树自底向上递归搜索。 |
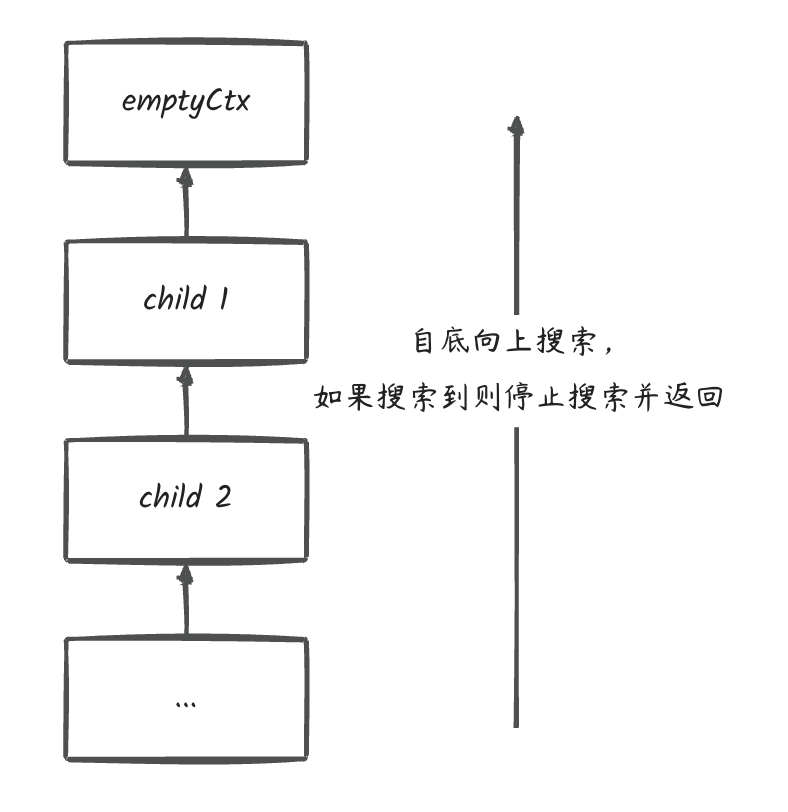
看下面的图可能会更加直观:
这个方法大概做的事情是,从当前的 Context 中查找指定的
key,如果找不到则递归地从其父级 Context
上找。
但我们最需要关注的是,它这里面
case *cancelCtx和case *timerCtx的逻辑表明了,在我们调用parent.Value(&cancelCtxKey)的 时候,实际上获取到的是当前Context到根Context上第一个cancelCtx。
一个更简单的图是下面这样的(当然在实际中,会有多个子节点,这里假设都是只有一个子节点):
为什么是通过关闭 chan 的方式取消?
上面我们说了,在 Context 取消的时候,是通过关闭
chan
的方式来实现的,那么为什么要这么做呢?这是因为,如果说要通过往
chan 写入数据的方式来 通知其他子孙 Context
的话,我们就需要有多少个子孙 Context 就要往
chan 里面发多少次,但是如果选择使用 close
的方式的话, 我们就完全不用管派生出了多少个可以 cancel 的
Context,因为一旦 chan 关闭了,所有的
<-chan 操作立即得以返回,这同样也实现了通信。 但是
close 这种方式无疑更加高明,更加简洁,当然也更加巧妙。
总结
本文主要讲了如下内容:
- 介绍了
context包的几个Context结构体,其中emptyCtx一般用作根Context,valueCtx一般用作请求范围内的数据共享,而cancelCtx给开发者控制下游Context提供了一种很好的方式,timerCtx在cancelCtx的基础上加了一个定时器,时间到会发送取消信号。 timerCtx有两种取消方式,一种是开发者手动取消,这个和cancelCtx一致,另外一种方法是到达deadline的时候,由定时器来取消。- go 里面
Context取消的时候,是通过关闭chan的方式来让下游的Context感知的,因为chan的工作机制就是如果被关闭则调用<-chan会立即返回。 - 创建
cancelCtx的时候,会将派生的Context挂载到上游Context中第一个cancelCtx的children上,这样在上游取消的时候,这个派生的Context可以感知得到。 - 上游取消的信号会跨过中间的所有
valueCtx,传达到下游那些cancelCtx,在取消的时候,Context会从Context树中移除。 - 如果开发者实现了自己的
Done通道,并且返回的是跟底层cancelCtx中不一样的done通道,则会导致 go 底层启动一个协程来监测这个被覆盖的done通道。 value也会从Context树中自底向上搜索,直到根节点。